
User manual (EN)
Versionsdatum:

TensionCARE - Advanced rein force measurement for equestrian sports
Sensors, Gateway, mobile application
User manual for
TensionCARE® Basic, TensionCARE® Premium
TensionCARE® Gateway
Safety instructions
All instructions must be read and followed in order to work safely with TensionCARE® . If TensionCARE® and/or its components are not used in accordance with these instructions, the integrated protective measures in the electronics may be impaired. In addition, improper use can lead to danger to life and limb. Never make safety instructions on the measuring tool unrecognisable. KEEP THESE INSTRUCTIONS IN A SAFE PLACE AND PASS THEM ON WHEN YOU PASS ON THE MEASURING TOOL.
Caution - if operating or adjusting devices other than those specified here are used or other procedures are carried out, this can lead to severe dangers.
Do not make any changes to the sensors, their mounting or the gateway. Do not attempt to open the mechanical components.
Before each use of the TensionCARE® components, ensure a secure fit, correct attachment to the reins and bridle ring as intended. Do not use force when fastening the straps and check that all components are securely attached before each ride with TensionCARE®.
Only have the measuring tool repaired by qualified specialists and only with original spare parts. This will ensure that the safety of the measuring tool is maintained.
Do not allow children to use TensionCARE® unsupervised. They could unintentionally harm other people or themselves.
Intended use
TensionCARE® is used to determine the rein forces applied during riding and helps to optimise riding behaviour and improve animal welfare through acoustic and visual feedback.
Introduction
Thank you for purchasing the TensionCARE® rein force sensors from ProAnimalCARE. These instructions will help you with commissioning and correct operation. We are also available via email and Facebook Messenger. In our social media you will also find videos for further understanding and handling of TensionCARE®, as well as tips and advice for the daily routine of fine riding.
ProAnimalCare wishes you lots of fun with your new product.
Our innovative sensor for measuring rein force is installed between the reins and bridle ring. TensionCARE® makes it possible for the first time to measure rein forces of up to 30 kg and continuously transmit the data wirelessly to the smartphone, where it is visualised. The rider can choose whether he wants to see the average rein forces on the display or receive the information acoustically.
Alternatively, it is also possible to display the data in a diagram in real time for an even more detailed evaluation of the riding behaviour. With this second function, the instructor can immediately analyse the forces applied and give his riding students direct feedback for better training results. The data can be saved on common mobile devices (iPhone, Android mobile phones) to view the session at a later time. It is also possible to export this data as a *.csv file to a computer for further analysis.
Compatibility
The user-friendly TensionCARE® app is compatible with all current mobile devices that support Bluetooth LE Below you will find a short list of compatible devices. Apple products require iOS 12 or higher, Android 6 or higher.
Android phones
Android tablets
iPhone
iPad
iPod Touch
Support
You can get help at any time from the operating and installation instructions stored in the app and from our Help Centre. You can find the help centre in the Hamburg menu under ‘Help’. Questions, concerns or problems regarding the app can also be resolved by contacting the TensionCARE® support team.
You can also contact our support team by phone or directly by email: info@proanimalcare.de - +49 391 2519 5944.
System operation
Switch on
Two different versions of TensionCARE® are available:
TensionCARE® Basic: For riders with a BLE connection - for direct communication between sensors and the mobile device carried. TensionCARE® Basic is characterised by its system-related short range and is used for direct feedback to the rider of rein forces during riding.
TensionCARE® Premium: For riders and trainers with extended requirements for range and stability with extended additional functions such as recording for later analyses on the PC. TensionCARE® Premium includes additional electronic components equipped with a long-range communication chip and enables distances of up to 100 metres. This requires the TensionCARE® Gateway, which is included in the TensionCARE® Premium version.
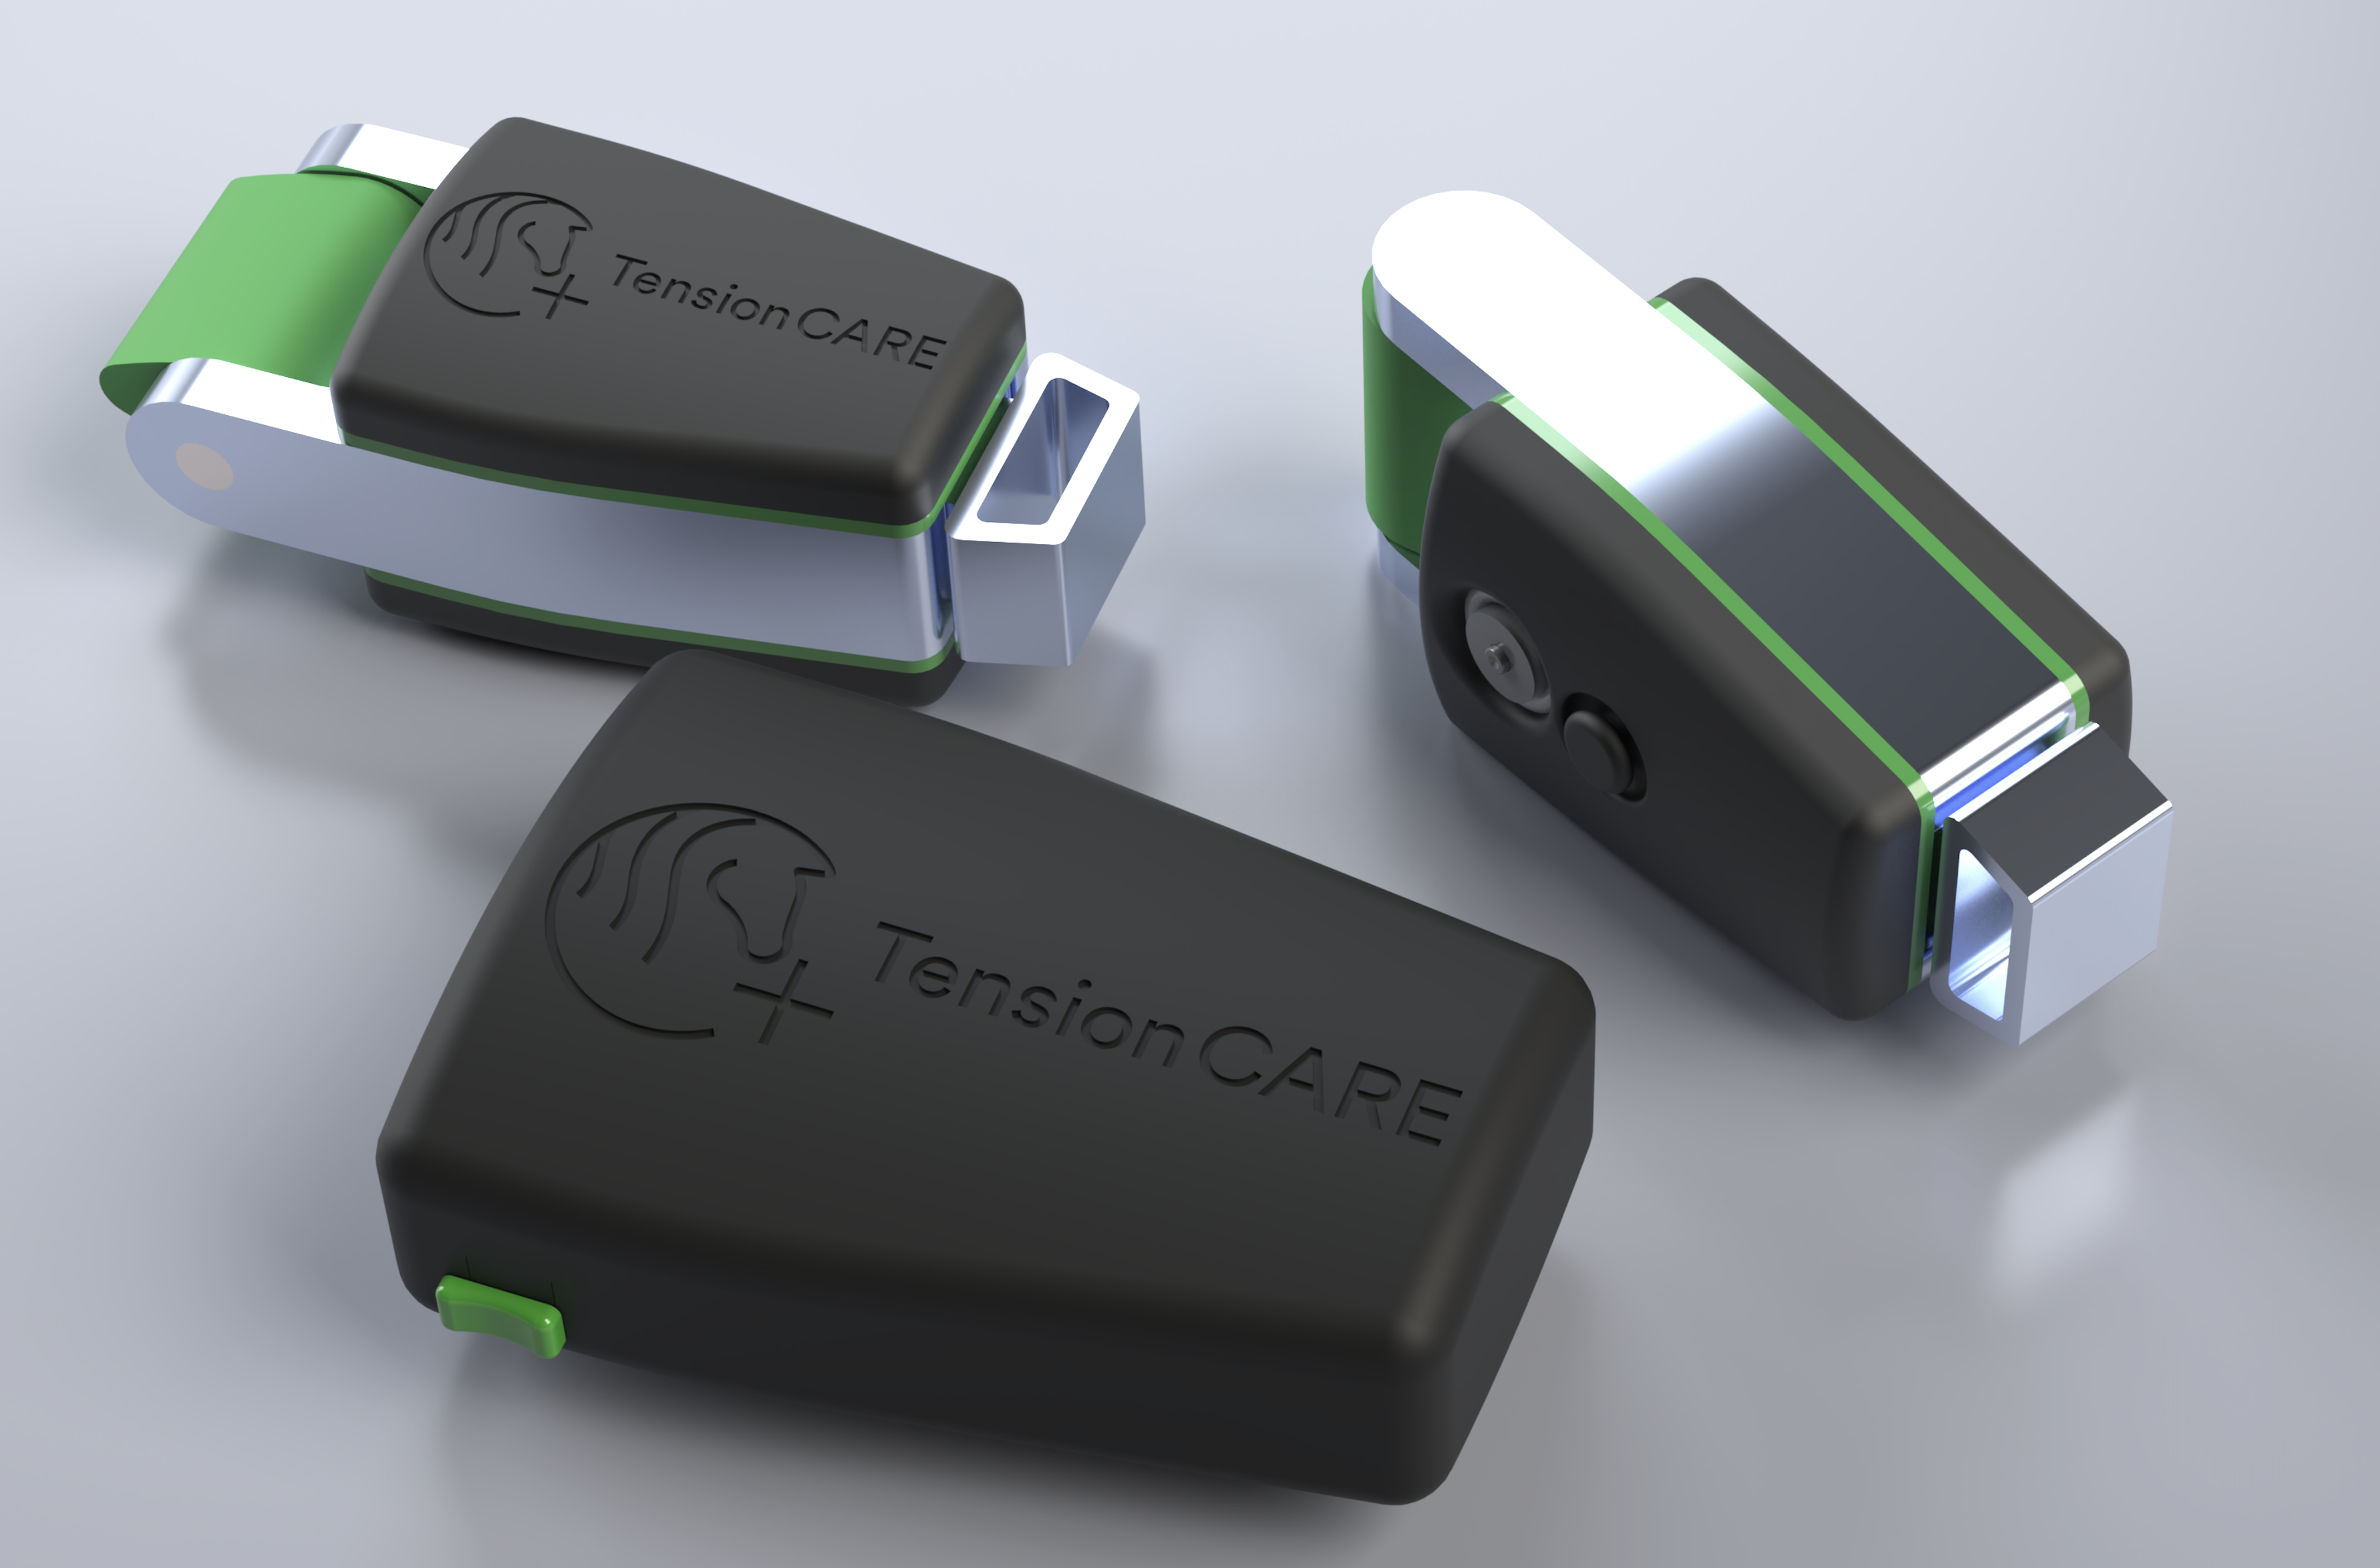
TensionCARE® Sensors and TensionCARE® Gateway (optional)
You can switch on the sensor by pressing the on/off button. As soon as it is switched on, a green light flashes; with TensionCARE® Premium you must also switch on the gateway by sliding the green switch to the left or right. To switch the sensor off, press the on/off button for 5 seconds until the green light is solid white and then release the button.
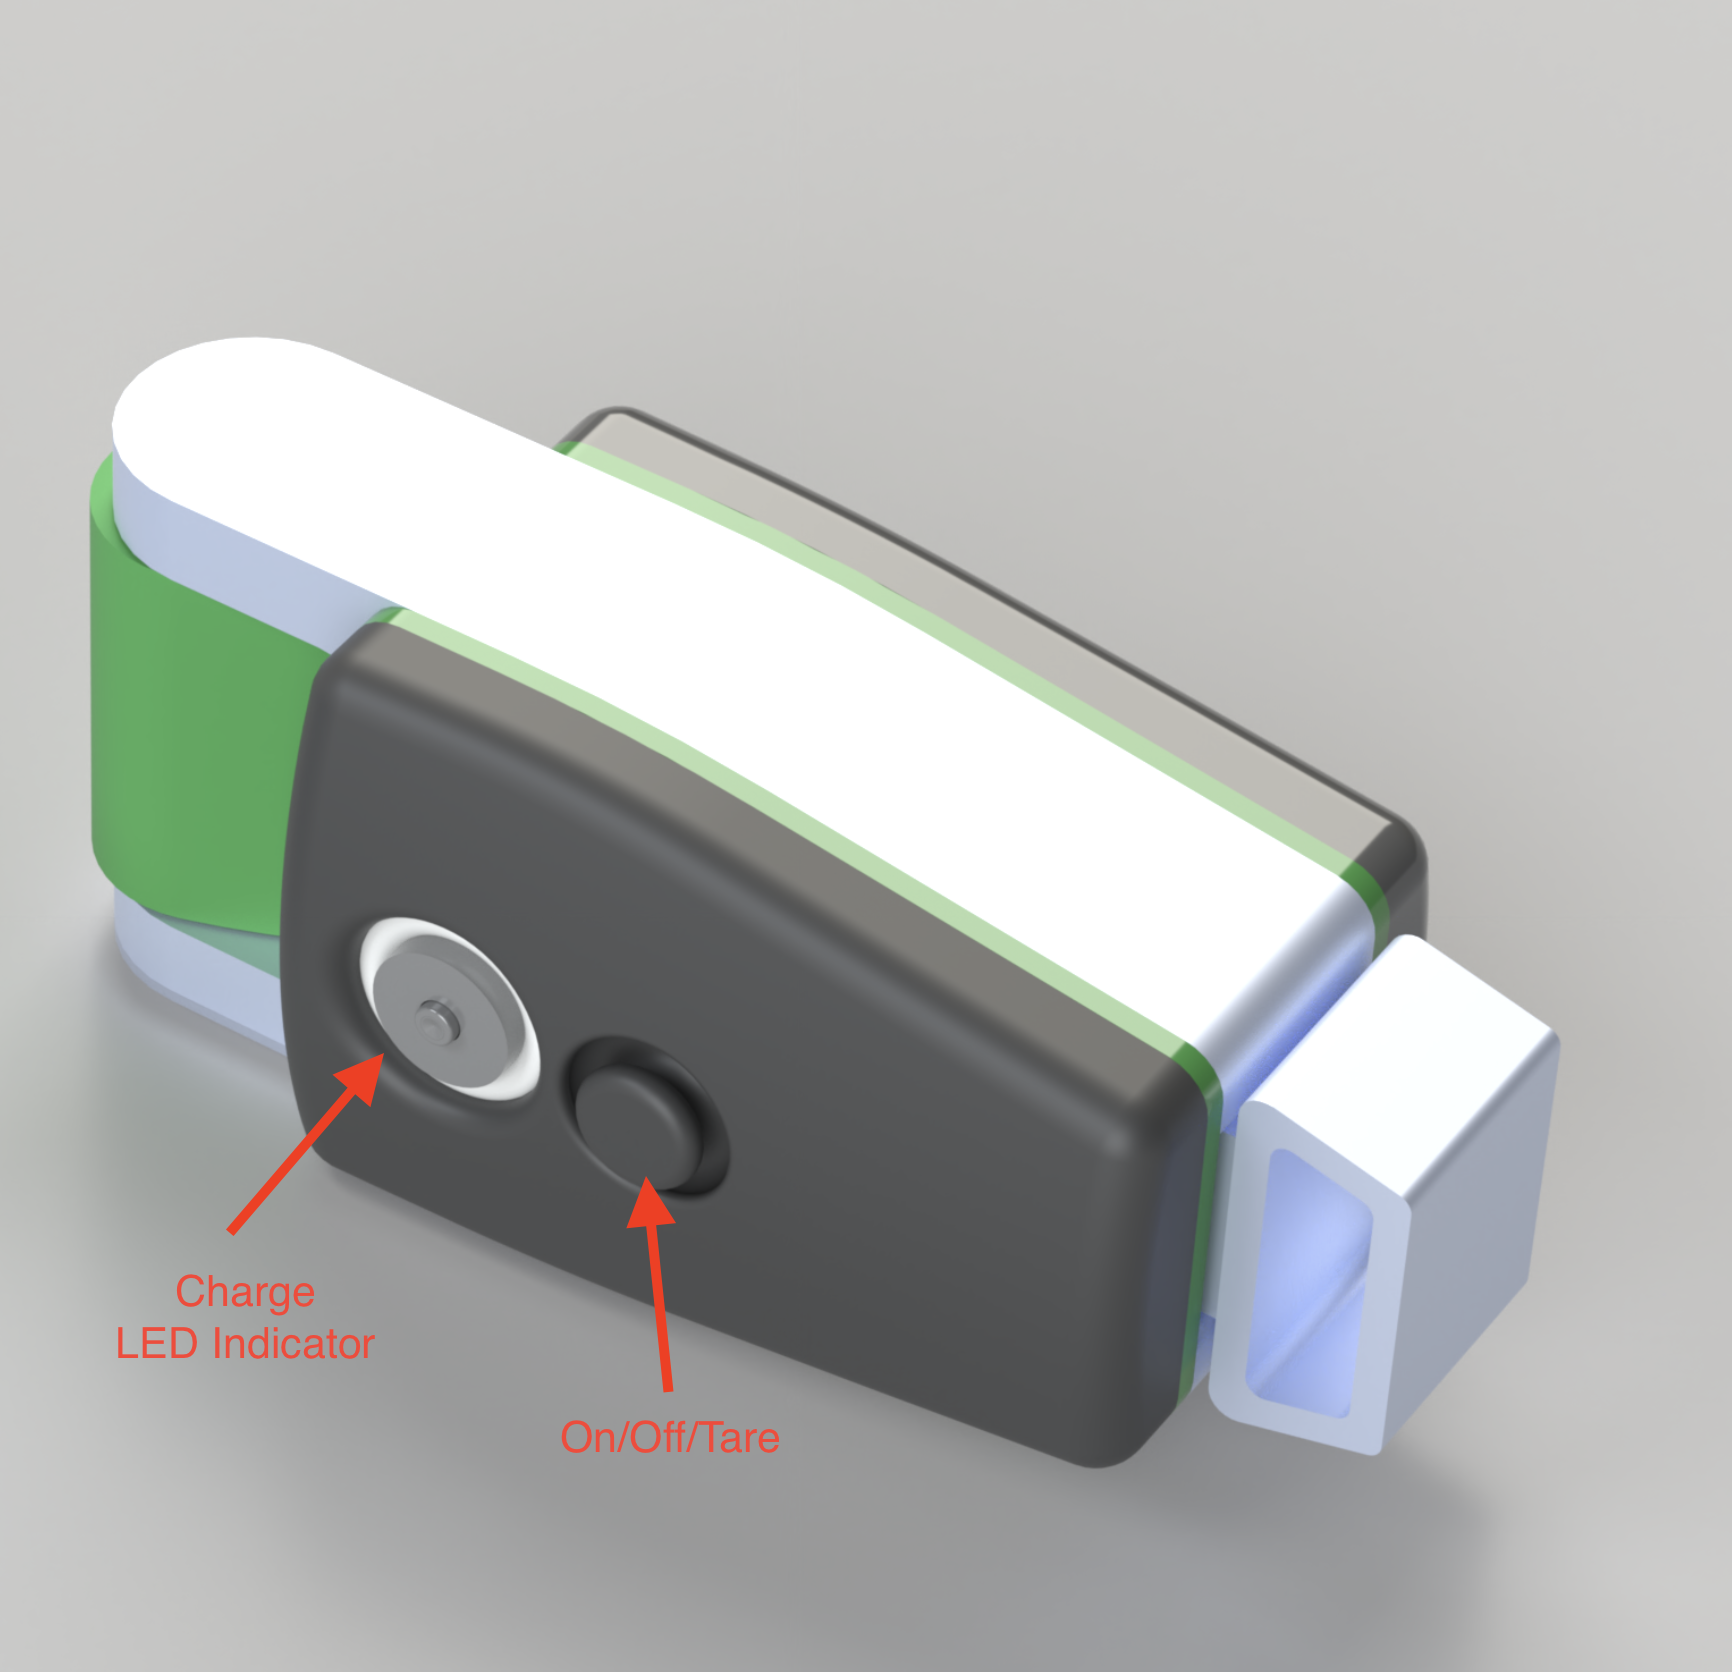
The TensionCARE sensor with on/off switch, magnetic charging socket and indicator light
App-Installation
Apple devices
Search for ‘TensionCARE’ in the App Store and install the application. Or you can scan this QR code to go directly to the app page. This is the direct link to the app for the TensionCARE app on your iPhone:
Search for ‘TensionCARE’ in the Play Store and install the app. Or you can scan this QR code to go directly to the app page. This is the direct link to the app for the TensionCARE® app on your Android smartphone:
https://apps.apple.com/de/app/tensioncare/id1499473008

Link to the iOS Appstore
Android devices
Search for ‘TensionCARE’ in the Play Store and install the app. Or you can scan this QR code to go directly to the app page. This is the direct link to the app for the TensionCARE® app on your Android smartphone:
https://play.google.com/store/apps/details?id=proanimalcare.tensioncare

Link to Google Play forAndroid
Installation
Mounting the sensors on the reins and snaffle ring
Connect the sensors to the rein(s) at the wide end. Please use the smaller leather connectors included in the package to attach the sensors to the bridle ring. The switch and the charging socket should face away from the horse.

Mounting of the sensors
Adjustment for thick reins
Clamping devices are provided on the reins to ensure a direct connection between the reins and the sensor and to prevent the sensors from loosely swinging. This is suitable for 3mm thick reins. If you use thicker reins, such as western reins, you can loosen the screws with a 3mm Allen key. The clamping device can then be removed and the sleeves supplied with the set fitted instead. These must then be screwed back onto the sensors.
Pictures sensor with 3 & 6mm preparation
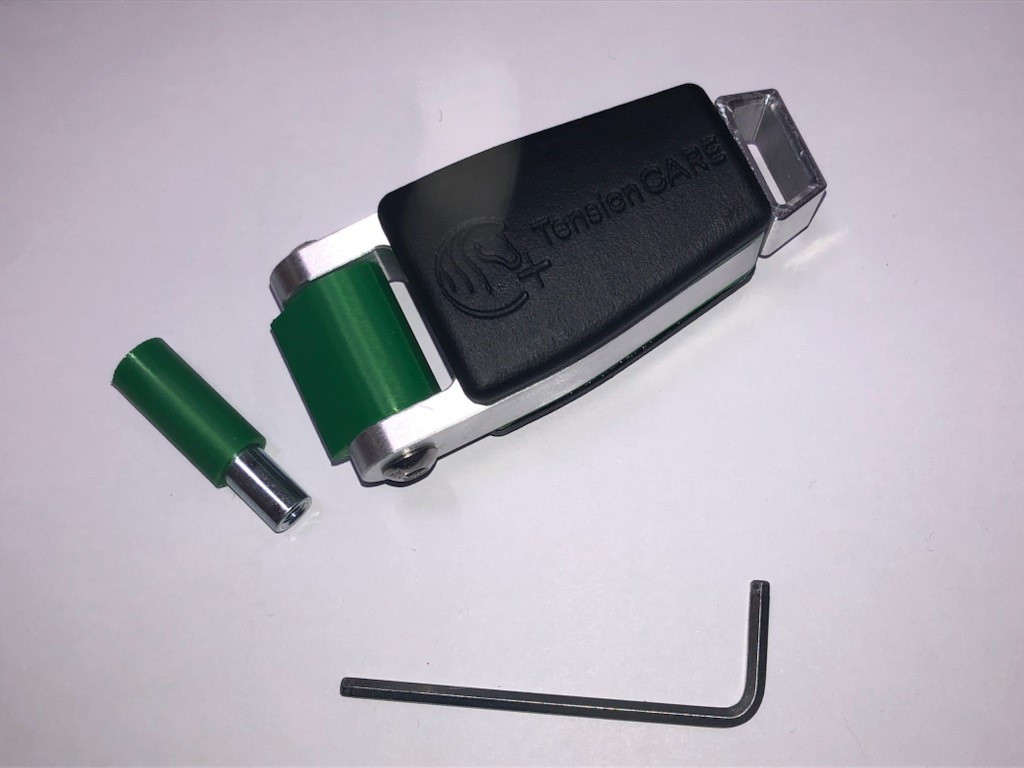
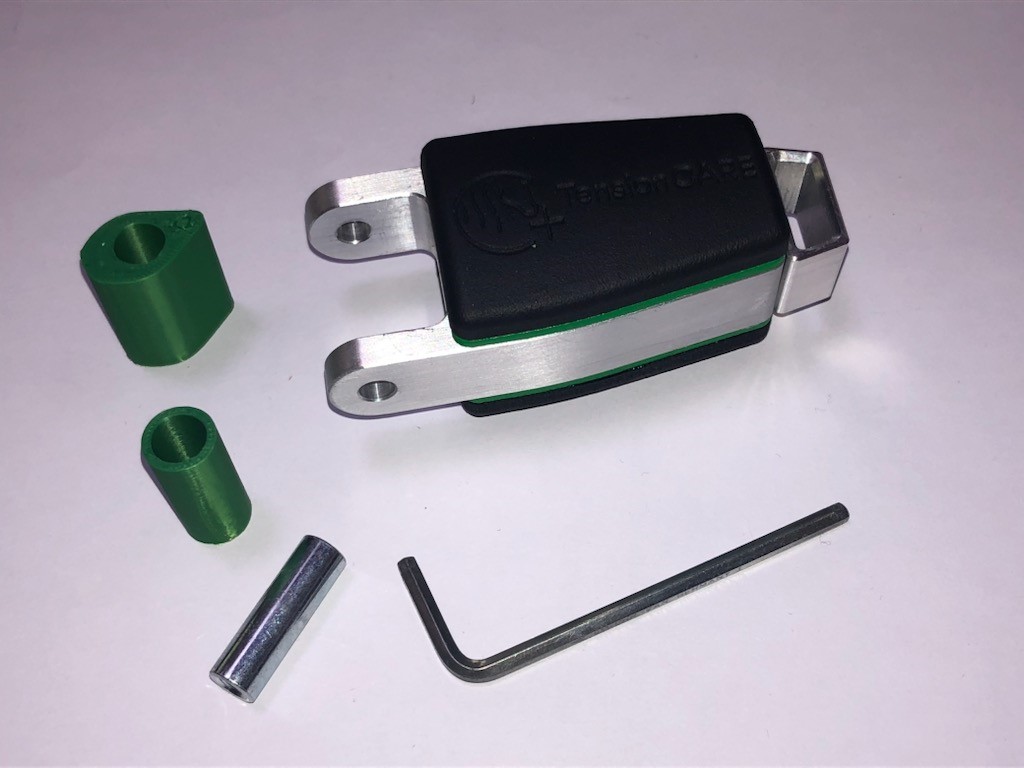
Attention! Please ensure that the screws are properly tightened. If the screws come loose, there is a risk of losing the cable connection.
Setting the zero point
To reset the tension value, briefly press the on/off button (while the sensor is switched on). Depending on how you hold the sensor when setting the zero point, the dead weight is either taken into account or only the pure rein force is measured. In the first case (illustration on the left), the weight of the sensor results in a zero point shift of around +100g. In other words, this setting measures the rein force exerted by the rider alone. In the other case, i.e. in the illustration on the right, you measure the complete force exerted on the horse's mouth. In the second case, the rein force exerted during riding plus the sensor's own weight is measured. It is important that you use the same method for both sensors.
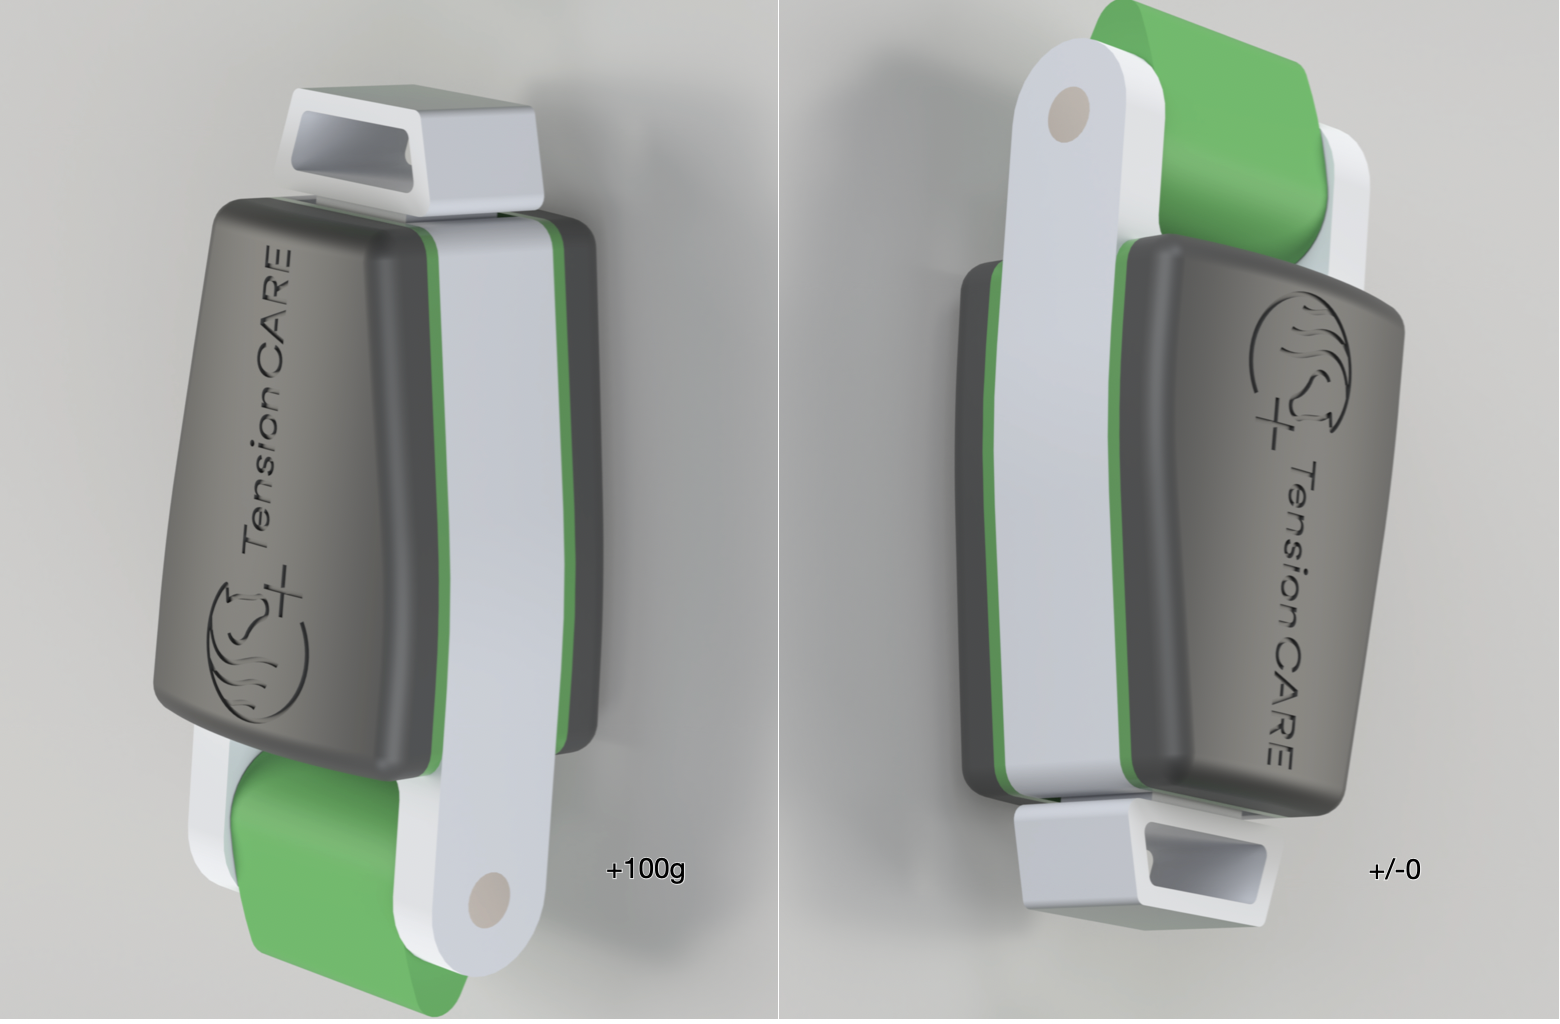
Zero point adjustment hanging from the eyelet (left) or from the rein side (right)
IMPORTANT: If you apply a load to the sensor and then press the tare button, you will shift the zero point - just like on a kitchen scale. The sensor will then show less load than you are actually applying. Unload the sensor and briefly press the tare button again.
Follow the instructions in the app to connect your mobile phone to the sensors and the gateway.
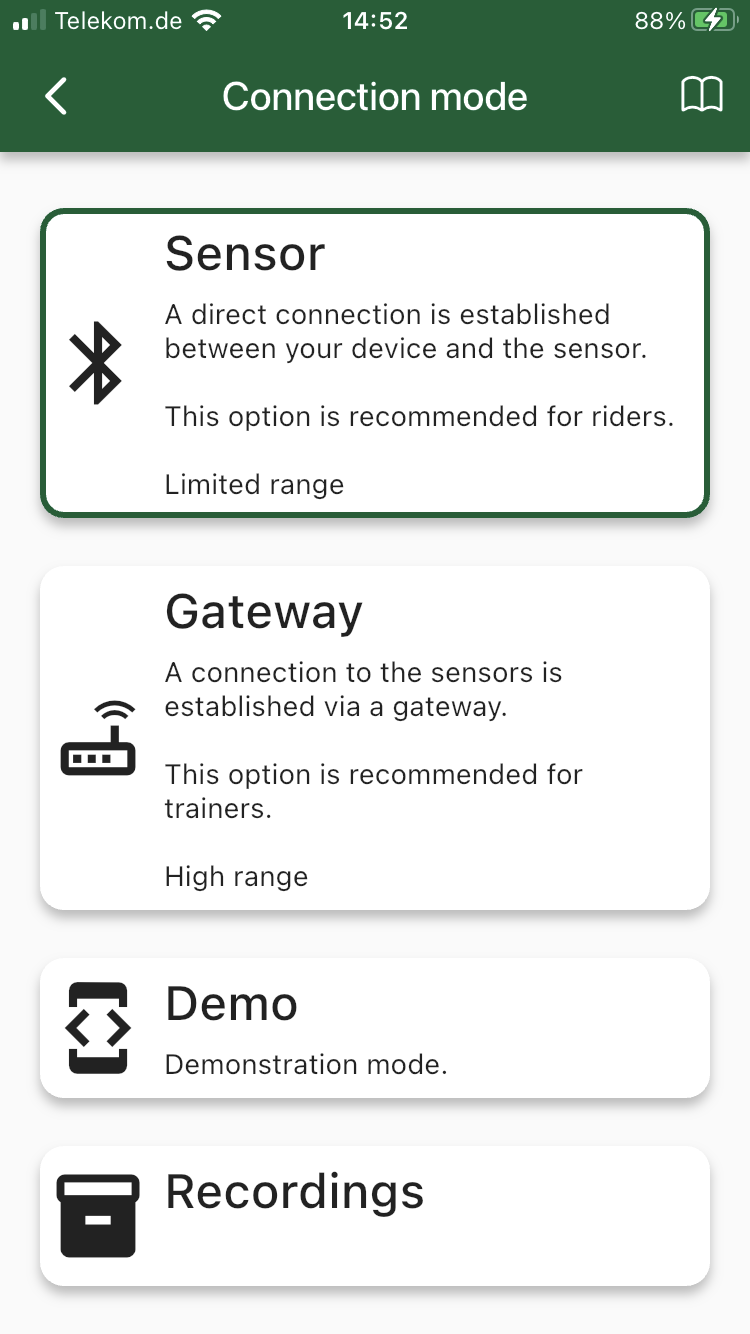
Connection modes
Start the app on your Android or Apple device. Depending on which sensor system you are using (TensionCARE® Basic or TensionCARE® Premium), the app should prompt you to pair the device directly with the sensors via Bluetooth (Basic and Premium) or via gateway (Premium only). To connect to the gateway, it is also necessary to activate your Bluetooth first.
Click Next to continue.
Connecting TensionCARE® Basic
A direct connection is established between the mobile device and the sensors via Bluetooth LE. The range is limited by the system, but is very suitable for riders as direct feedback during riding to optimise rein forces.
Click on Sensors to continue. The app may ask for Bluetooth access.
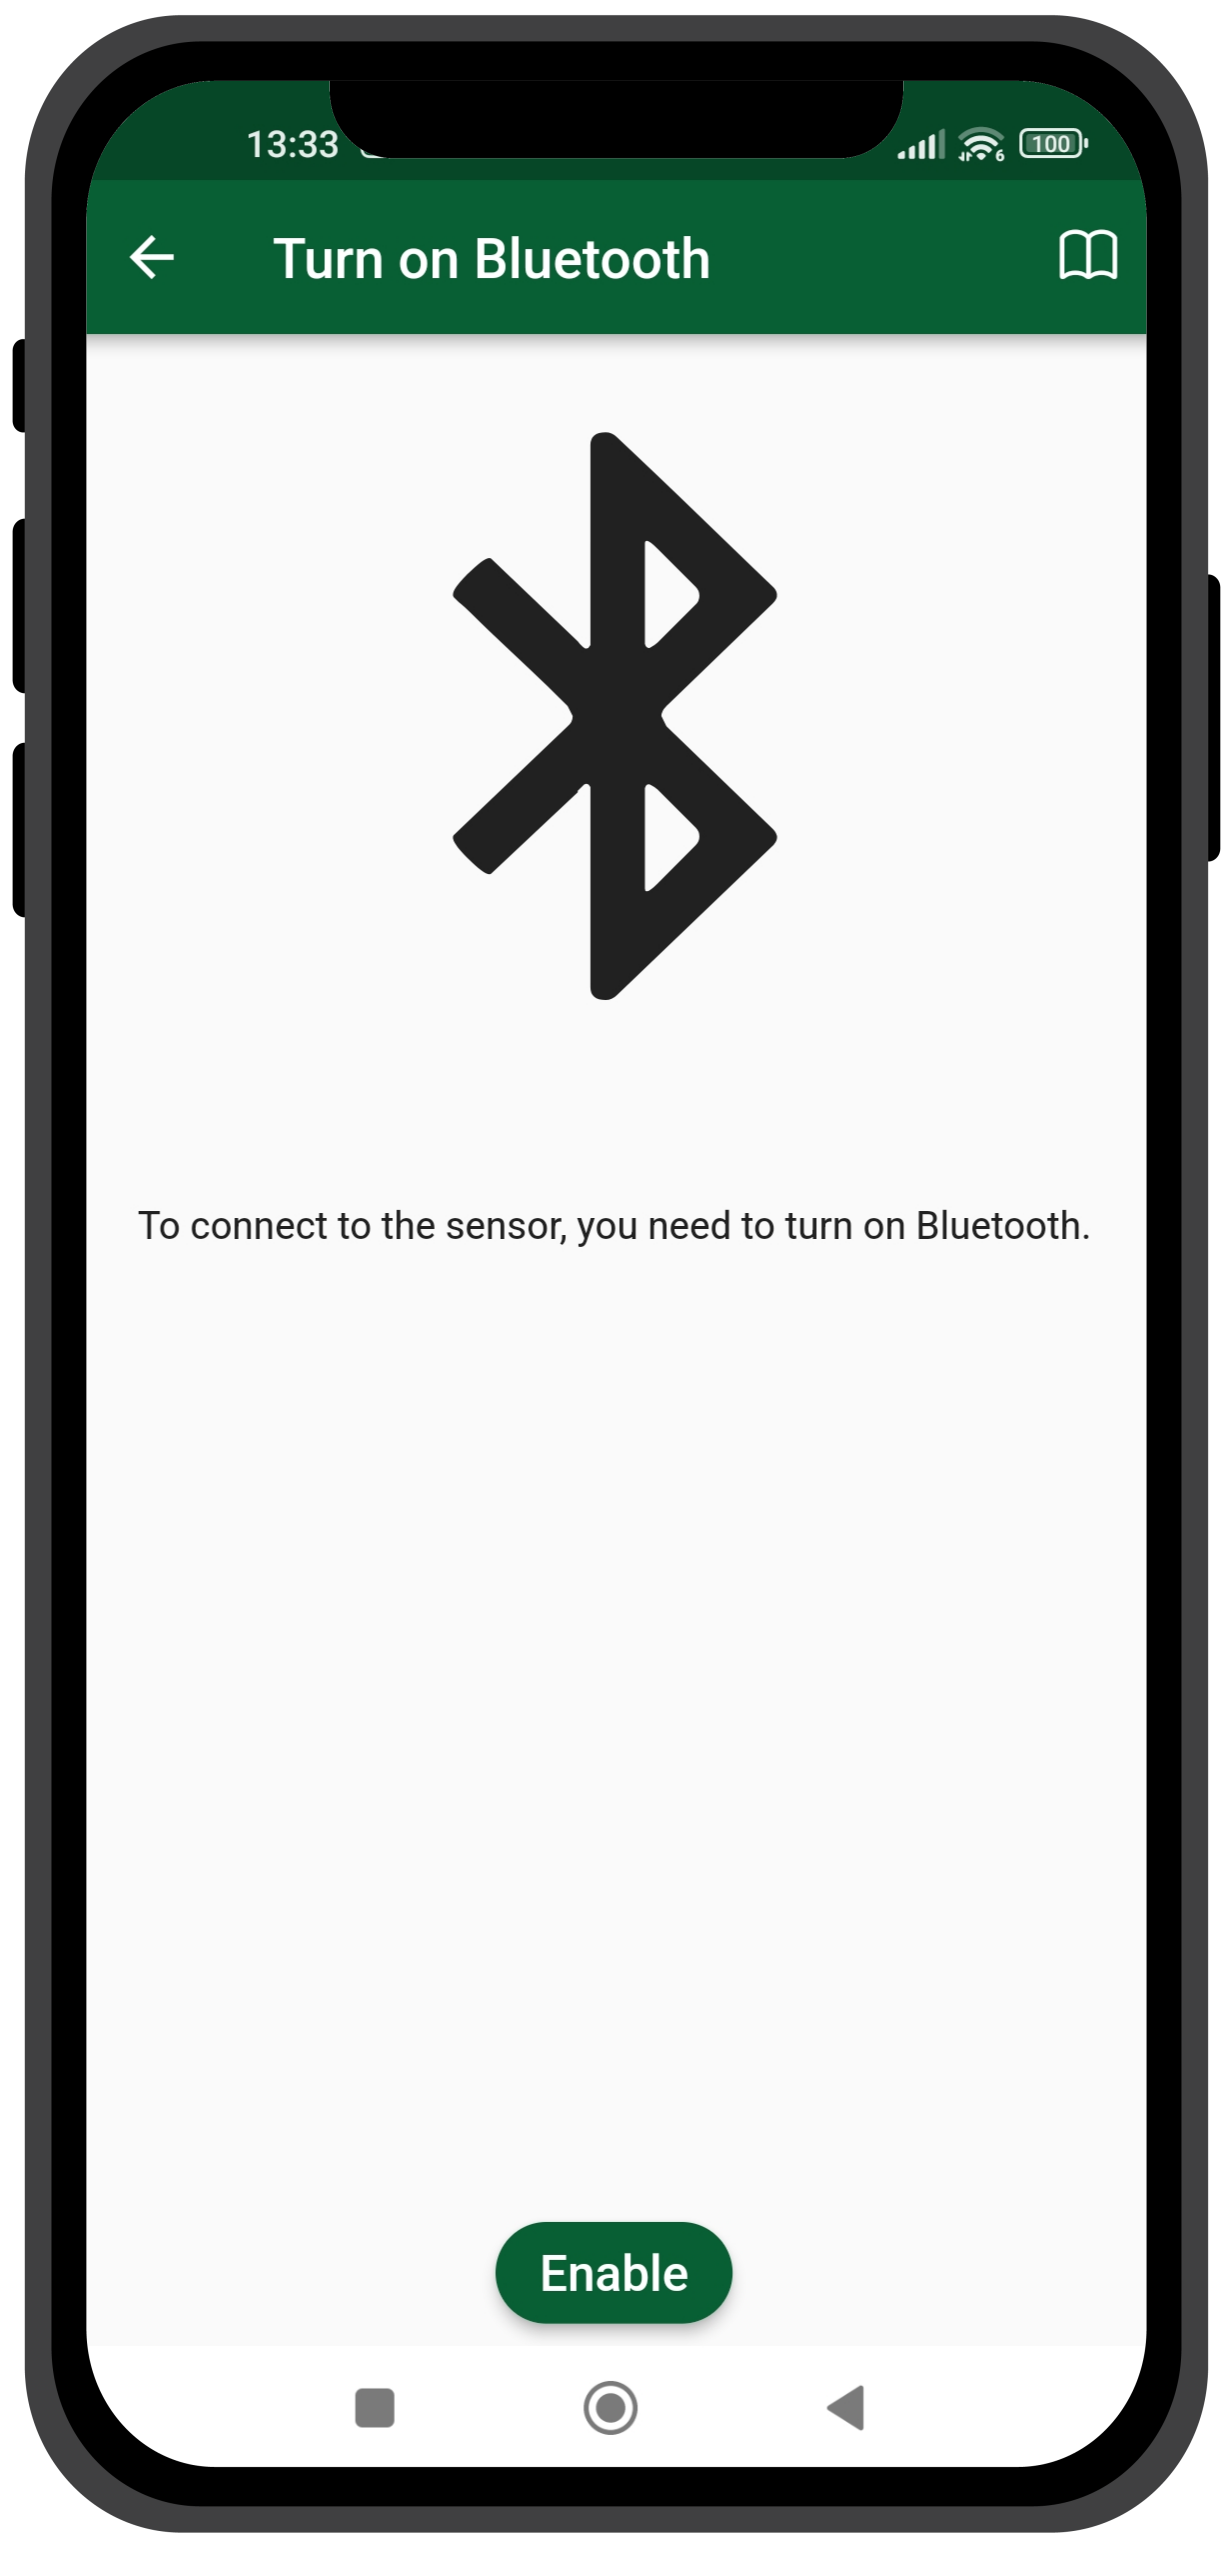
Please tap on >Enable<
Click on Enable to grant permission for the Bluetooth connection to your mobile device and make sure that the Bluetooth function on your phone is switched on.
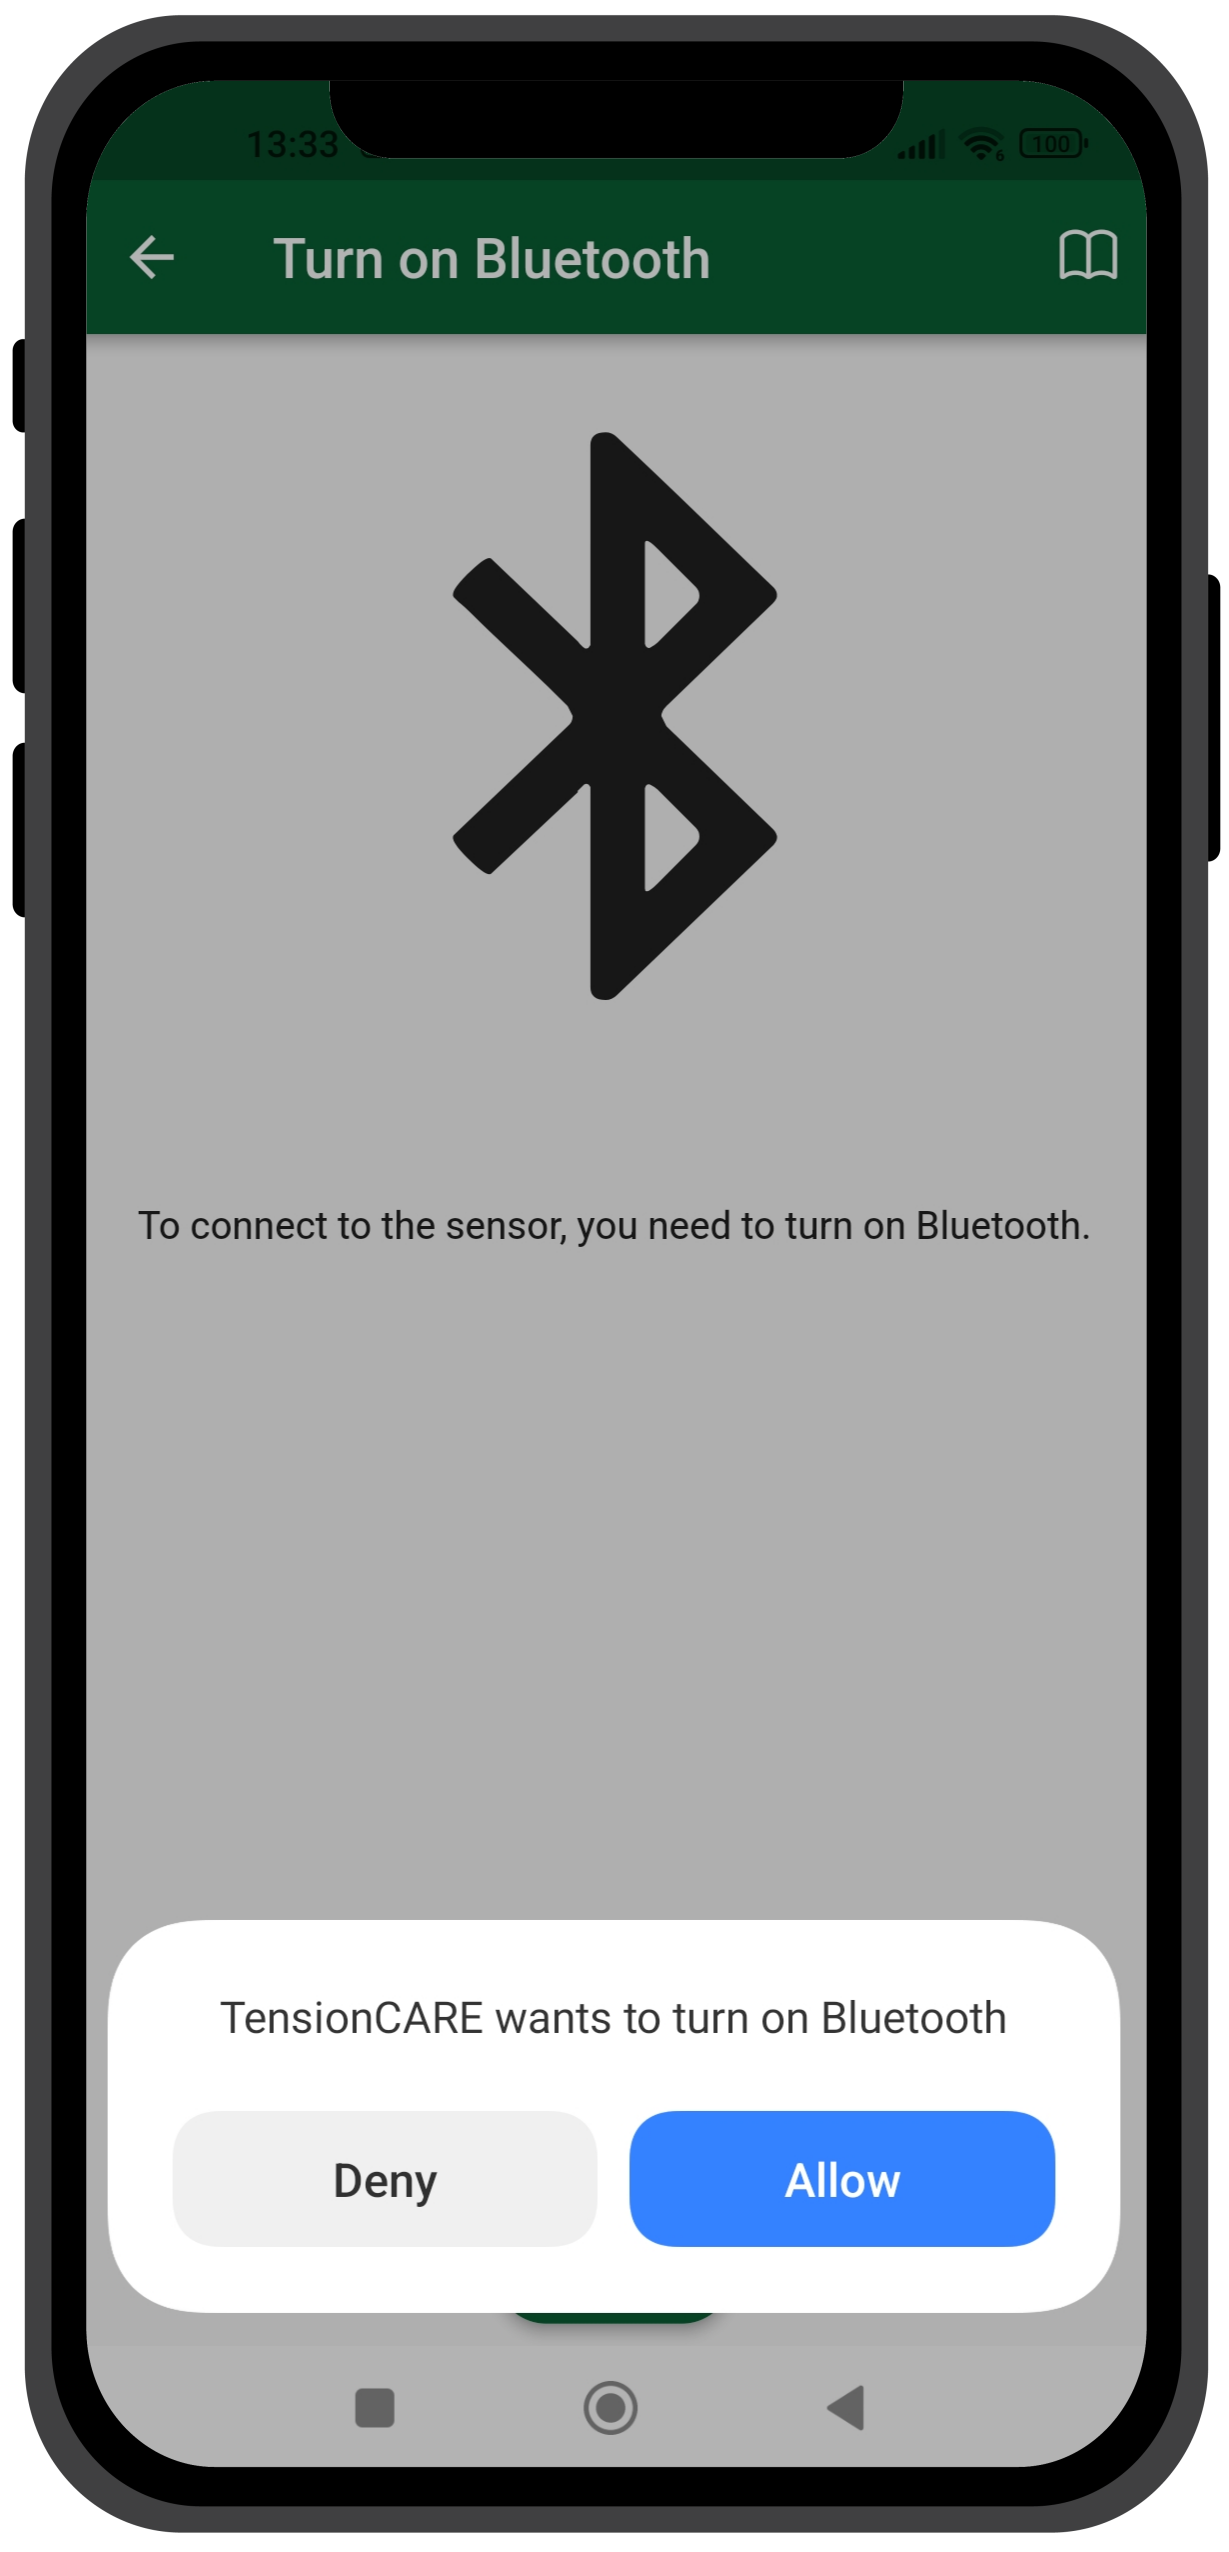
Please tap on >Allow<
Now switch on the first sensor. This should automatically connect to the app. If this is not the case, try restarting the app or click on Choose manually. If manual selection is chosen, a list of available sensors will show.
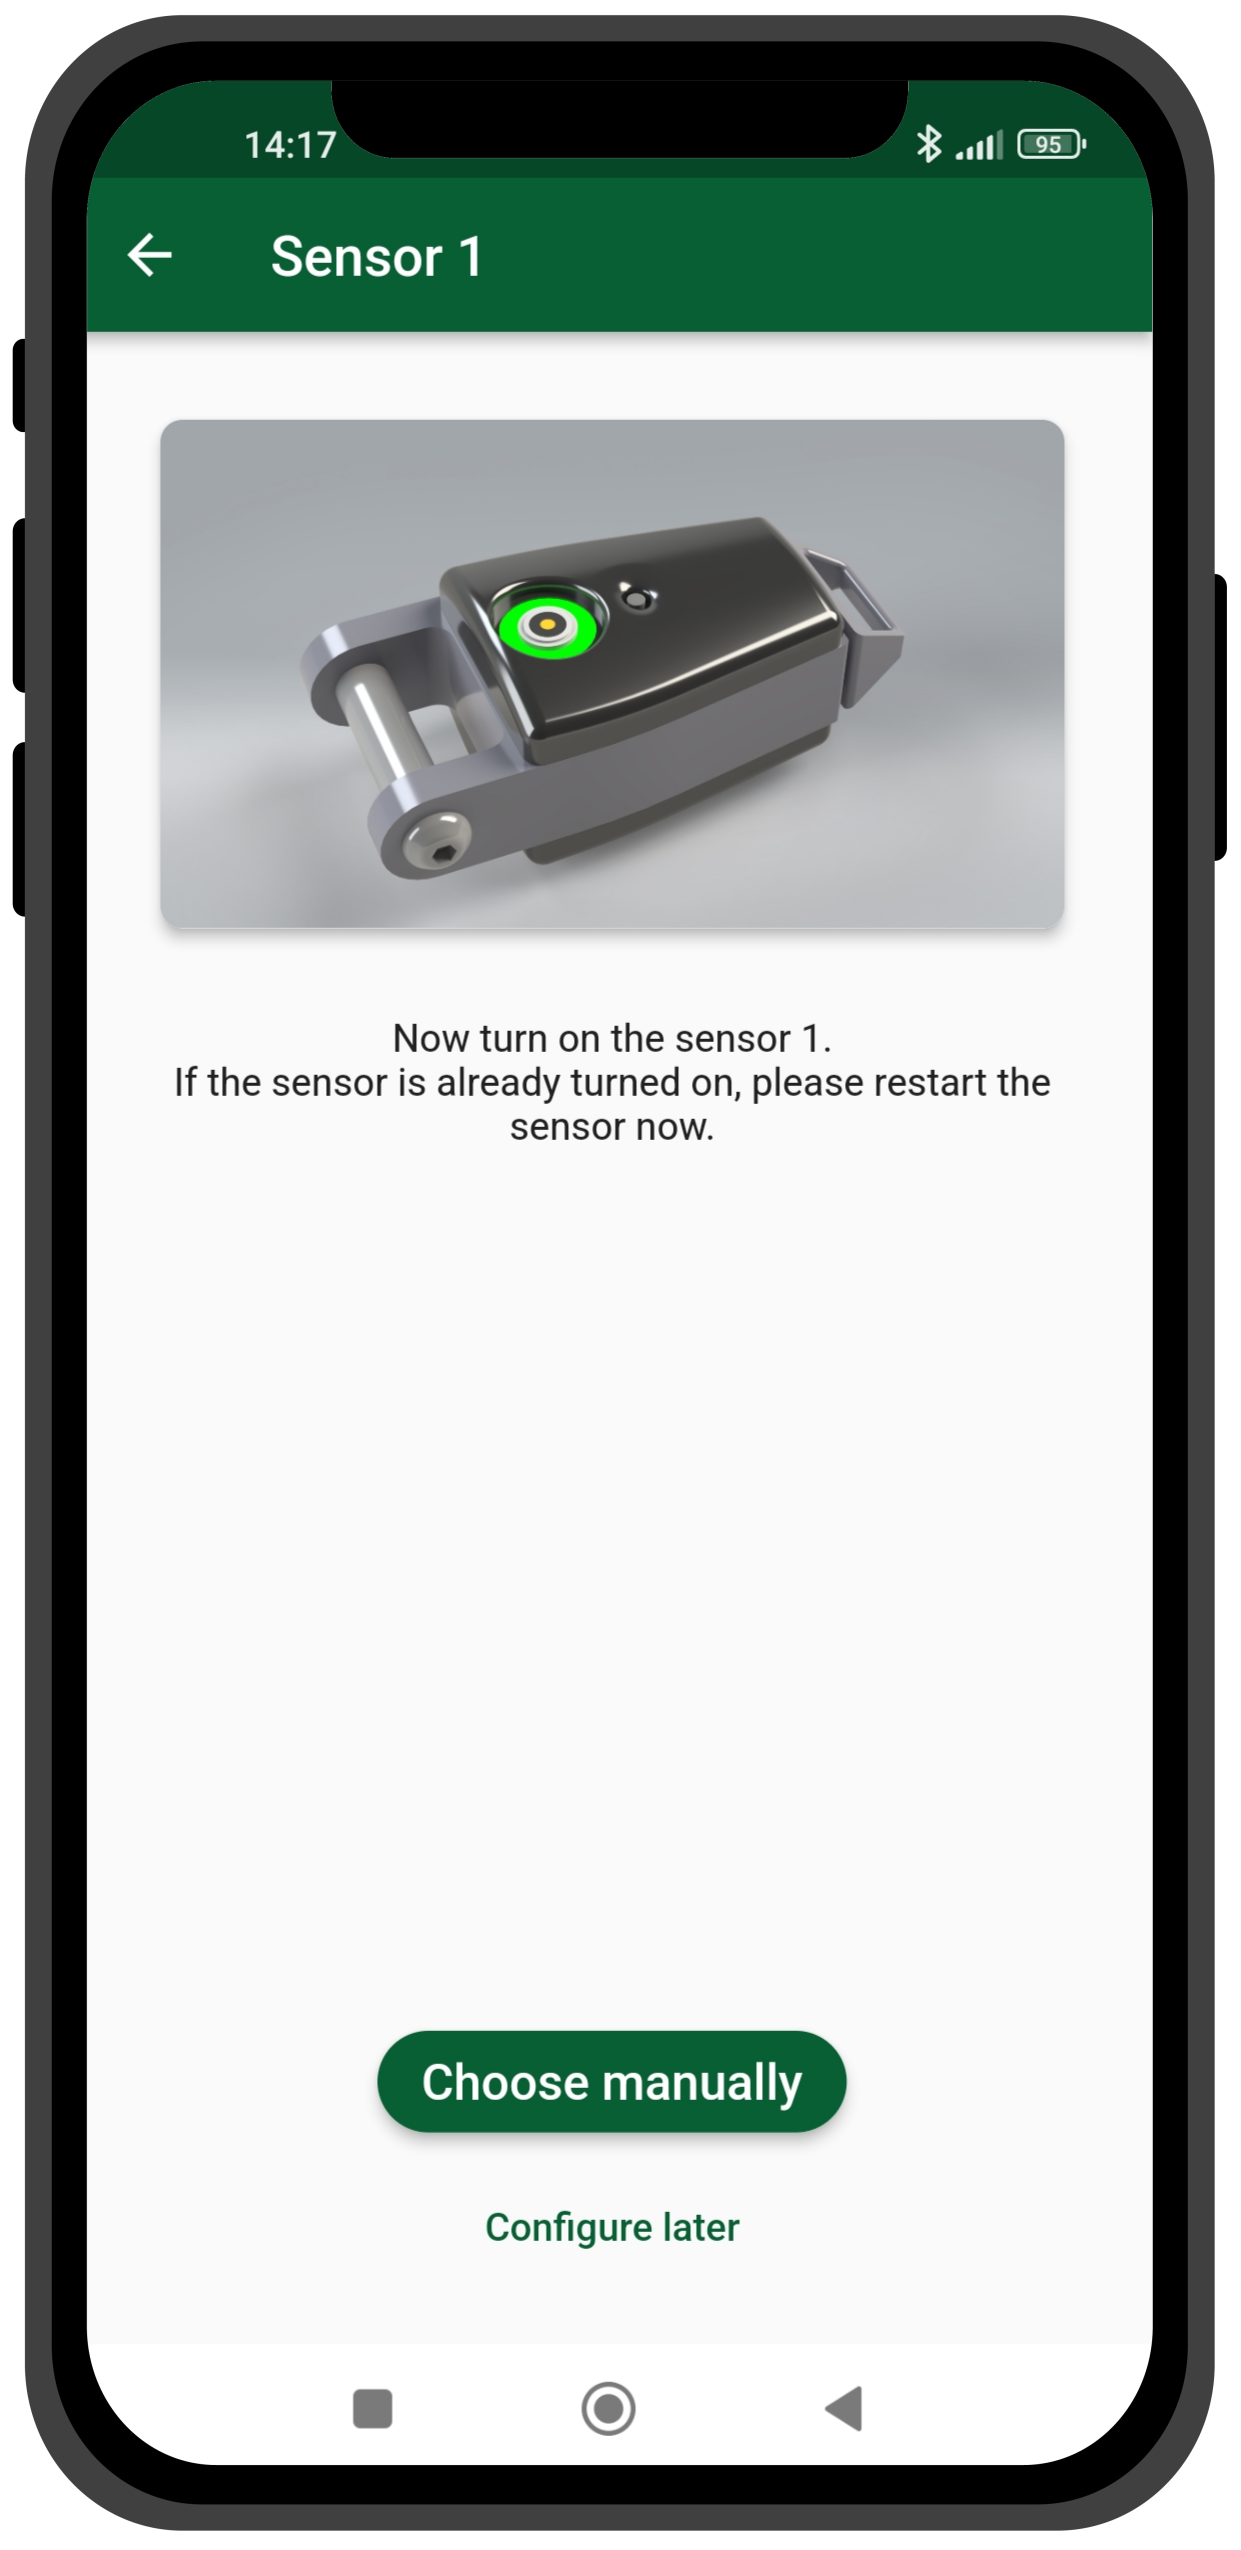
Repeat this for the 2nd sensor.
Connecting TensionCARE® Premium
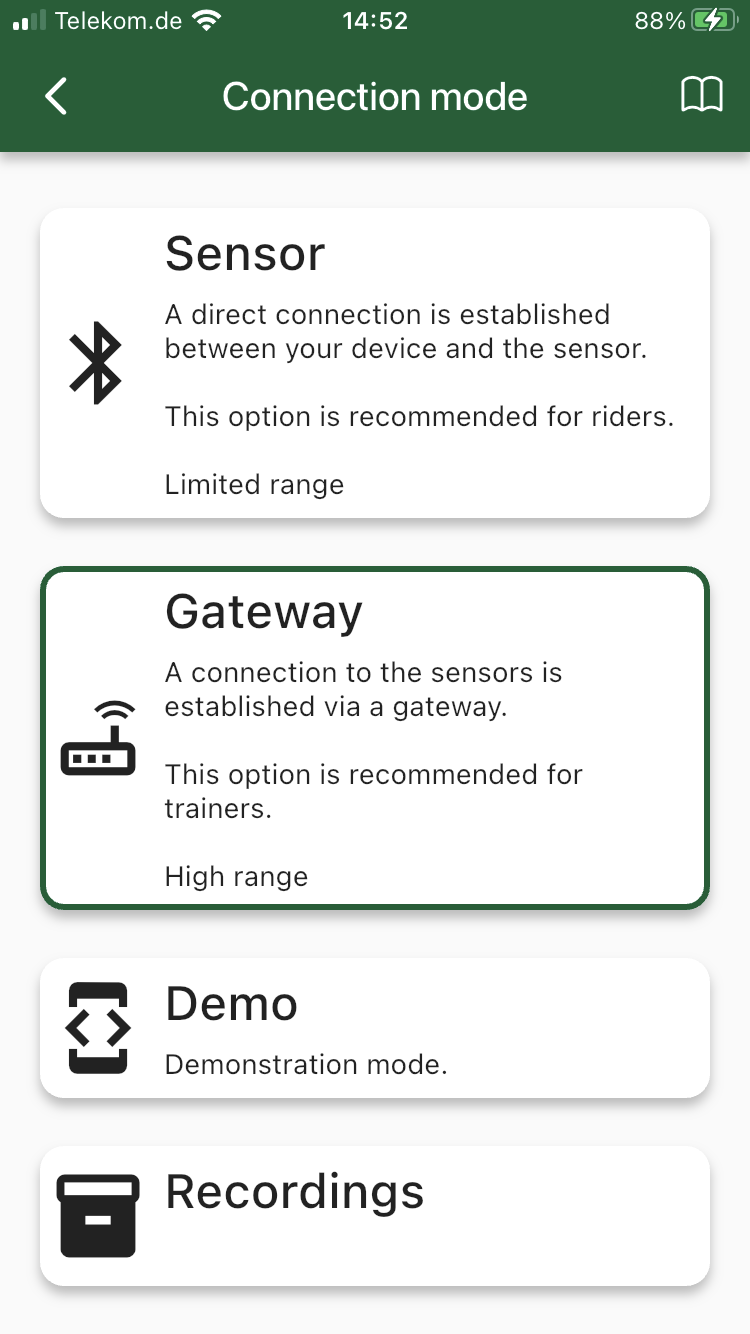
TensionCARE® Premium offers different connection modes: On the one hand, Bluetooth can be used for a short range, as with TensionCARE® Basic. On the other hand, TensionCARE® Premium enables the use of a gateway and thus achieves a long range (high-range up to 100 metres).
Sensor mode
Click on Sensors to continue. The app may ask for Bluetooth access.
Click on Enable to grant permission and make sure that your phone's Bluetooth function is switched on.
Please tap on >Allow<
Now switch on the sensor, it should automatically connect to the app. If this is not the case, try restarting the app or click on Choose manually. If manual selection is chosen, a list of available sensors will show.
Gateway mode
This option is only available in TensionCARE® Premium. It can be used to establish a connection with the sensors via a gateway and maintain a range of up to 100 metres. TensionCARE® Premium has additional functions and extended options for data and video recording and analysing data and is more suitable for trainers.
If you have purchased TensionCARE® Premium, you can simply switch on the gateway and follow the on-screen instructions to connect.
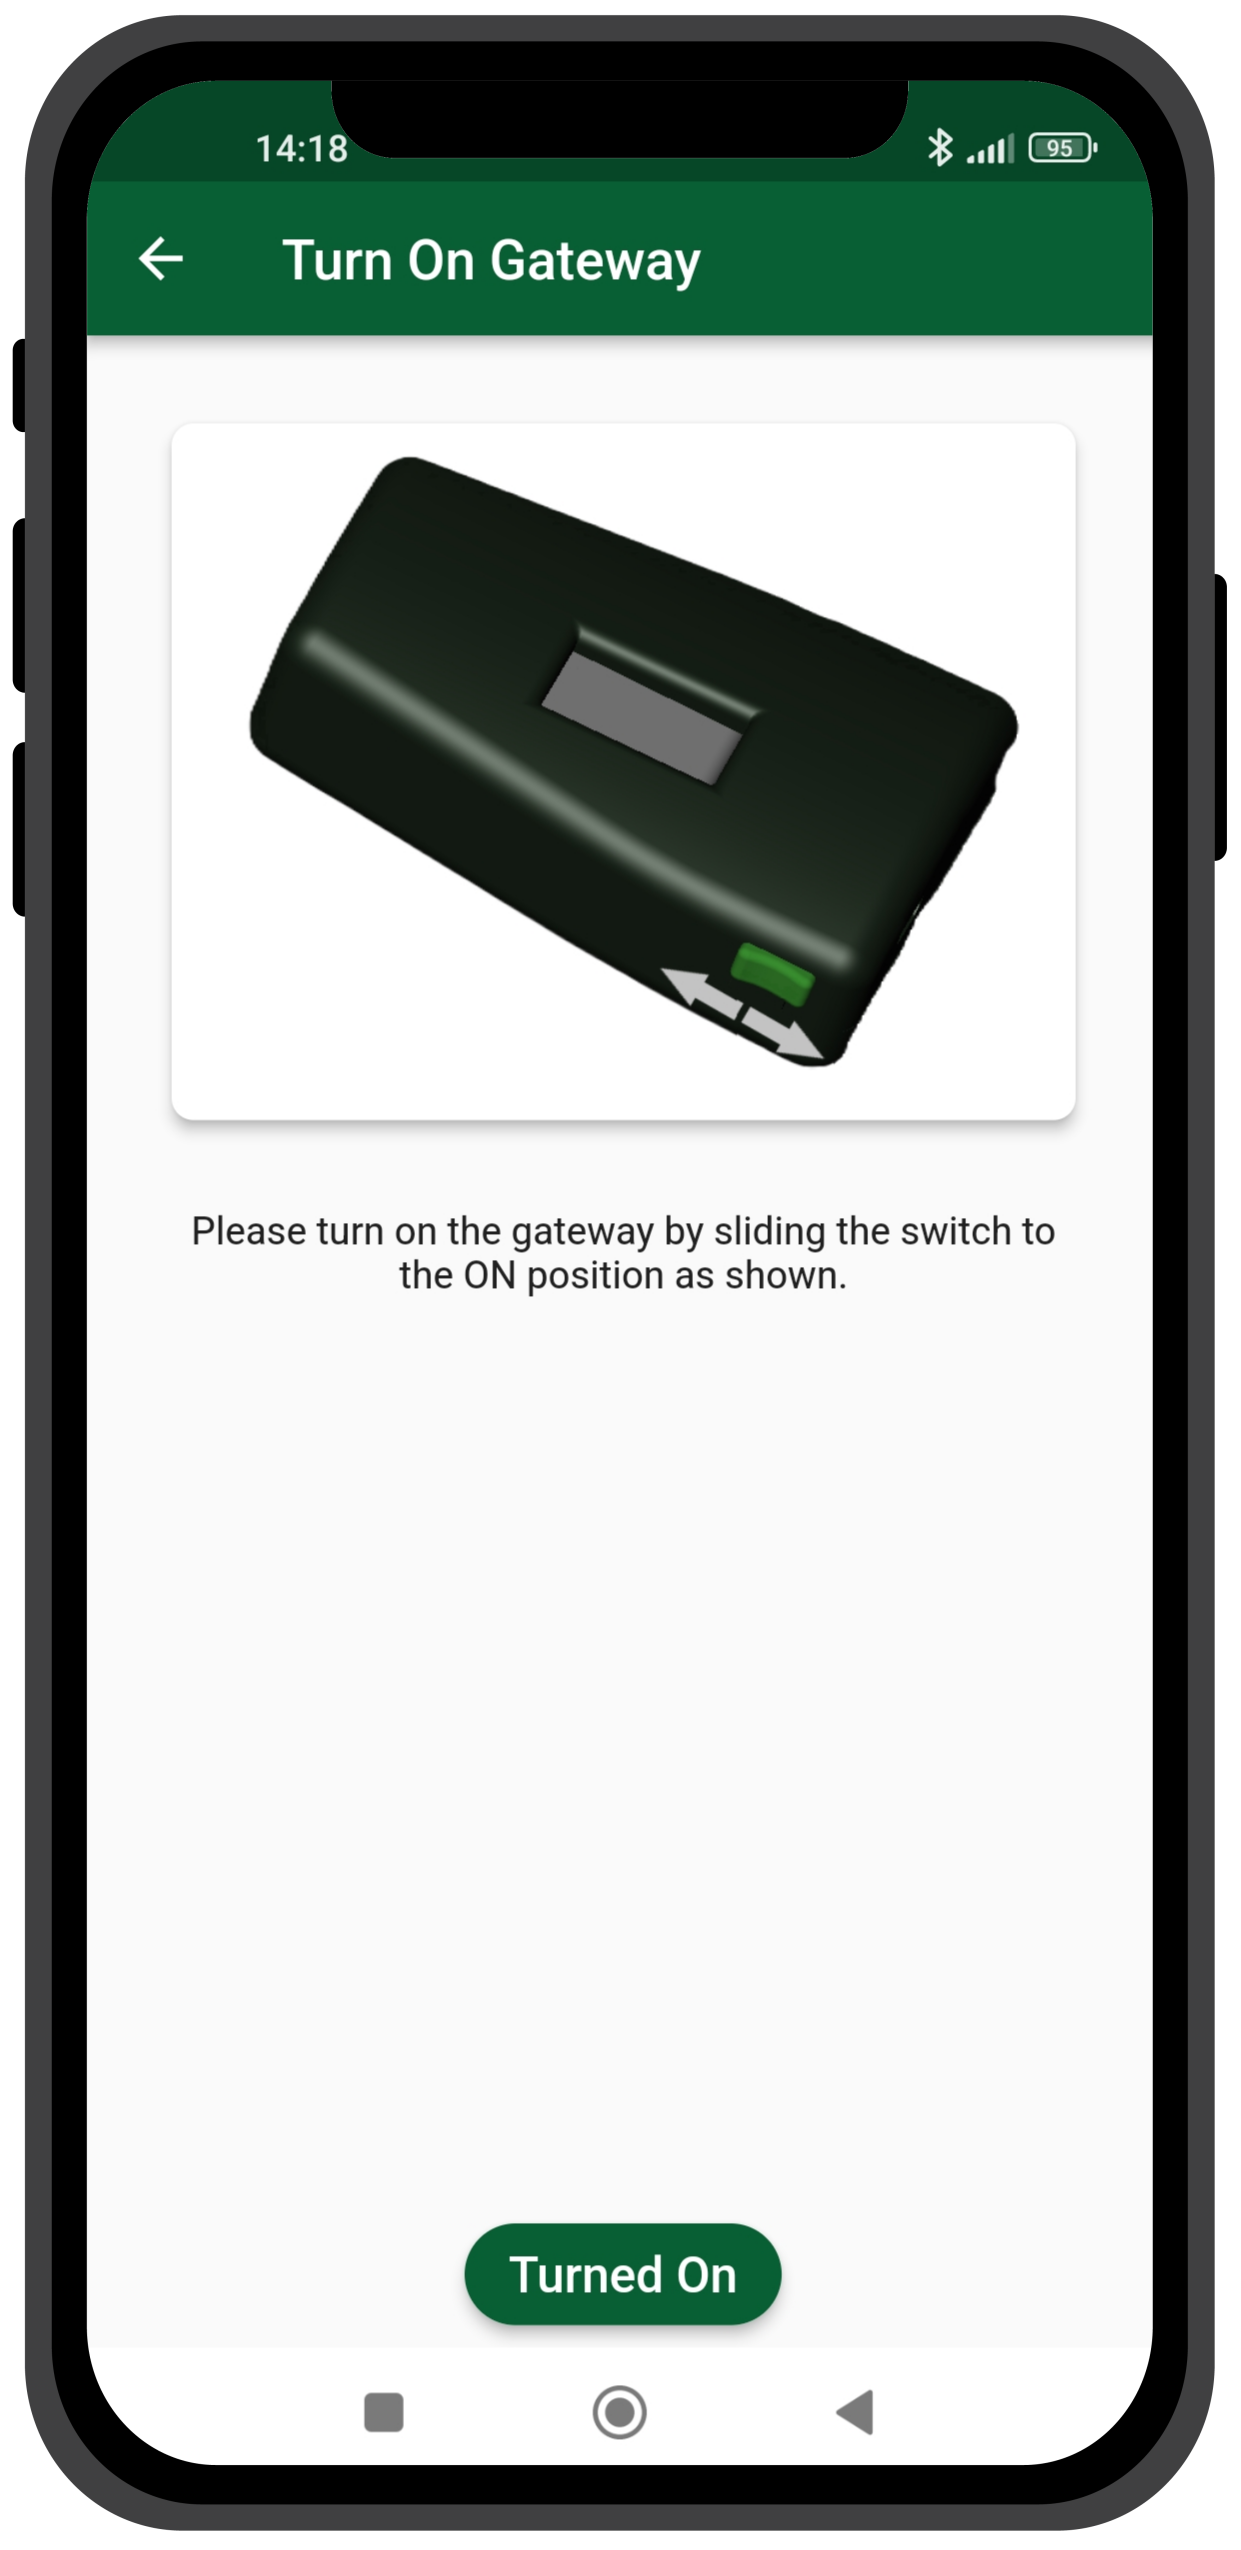
Tap on Turned On to continue. You will then be shown a list of available gateways. Select the desired gateway by tapping on it.
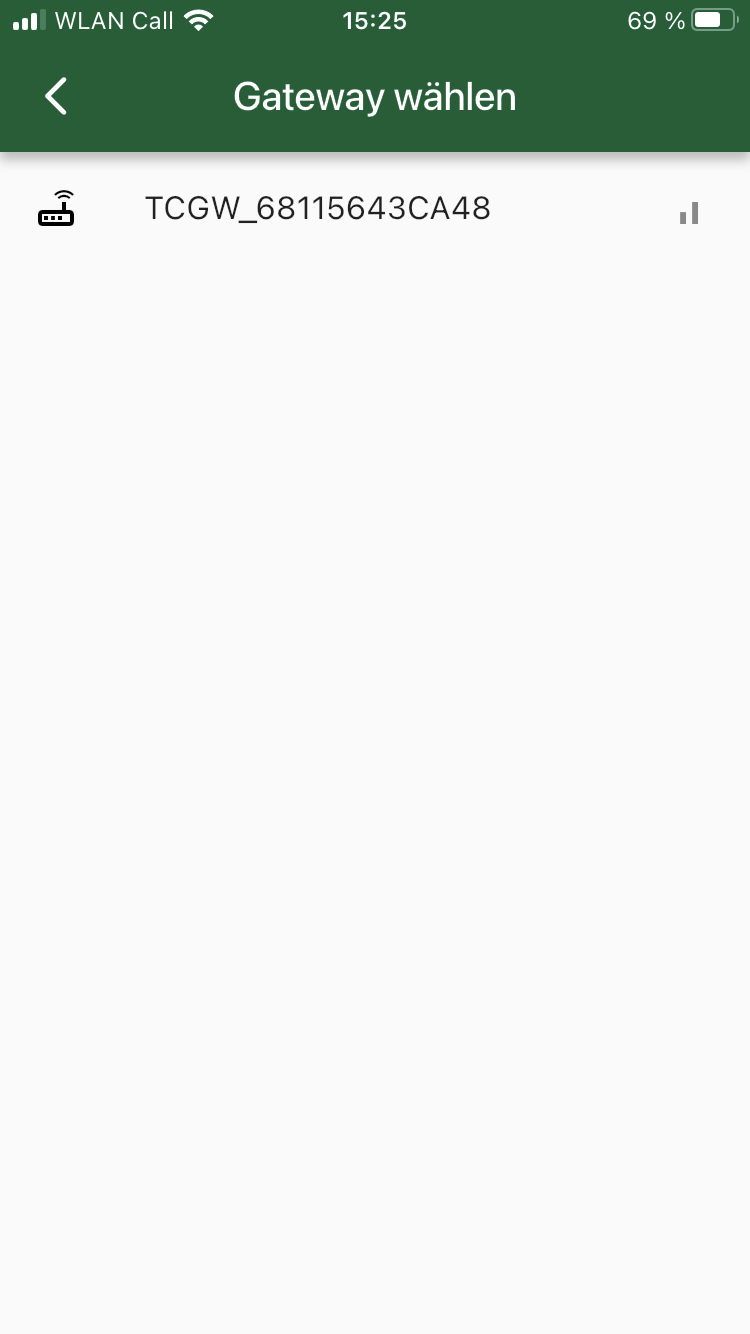
The selection of sensors follows as in sensor mode.
Charging sensors and gateway
With the purchase of TensionCARE® you receive the following:
Charging cable with 3 plugs
2 x magnetic pins for the sensors
1 x USB-C for the gateway
All devices can be charged at the same time.
Tensioncare App
Settings
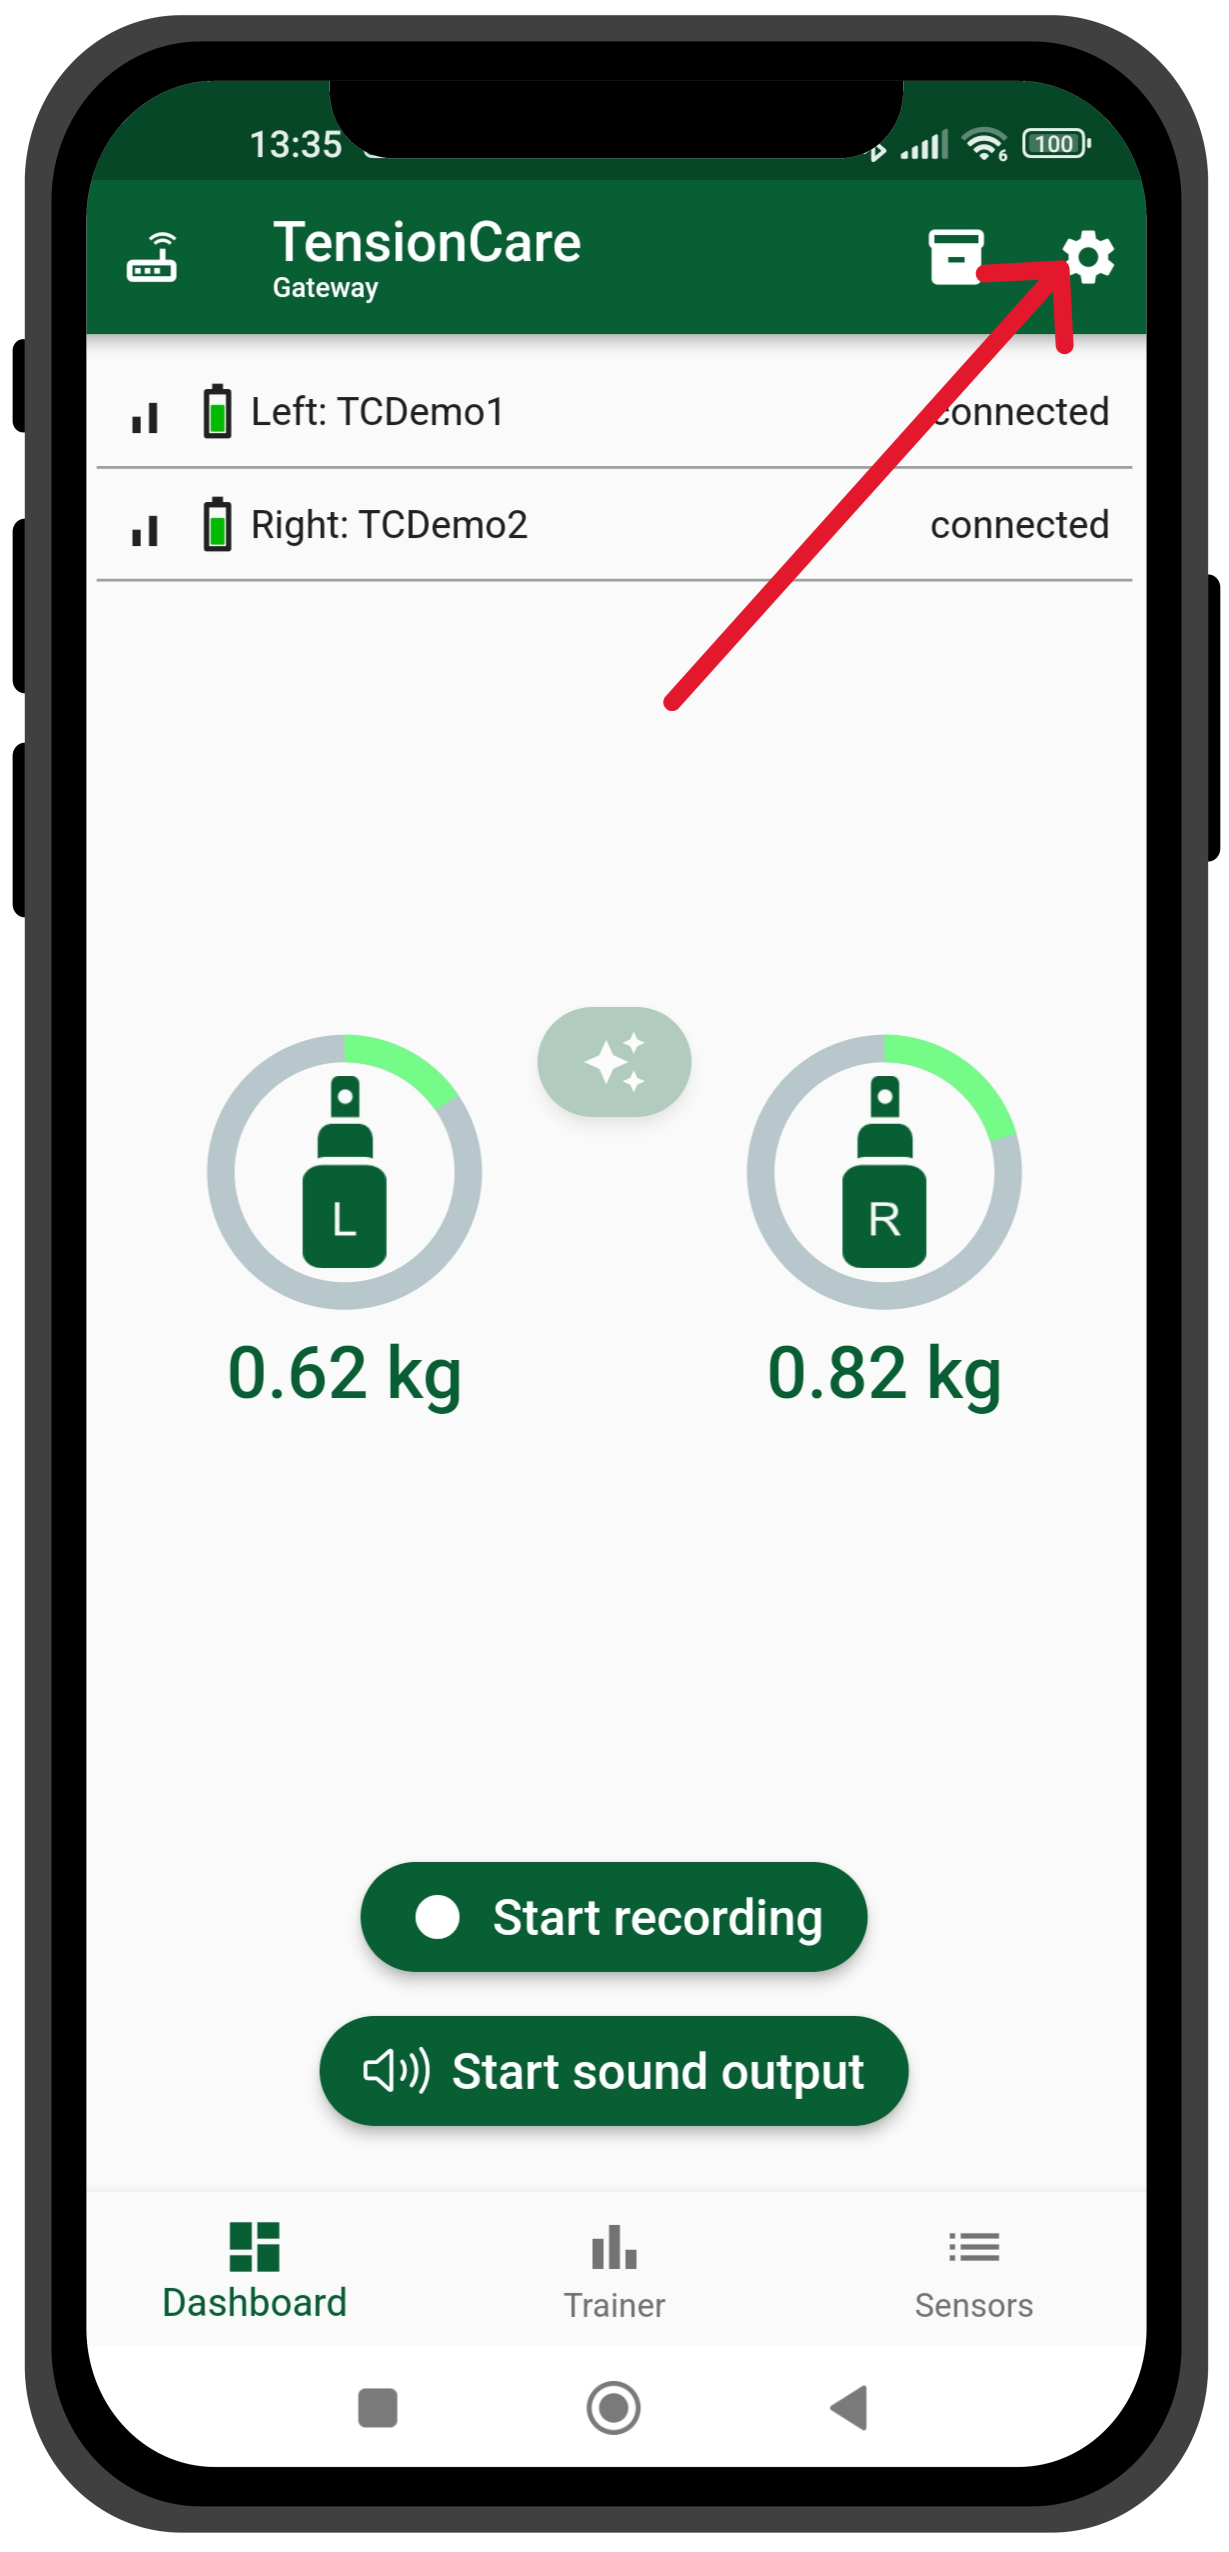
Click on the gear icon at the top right to open the Settings menu.
You can access and change the following options:
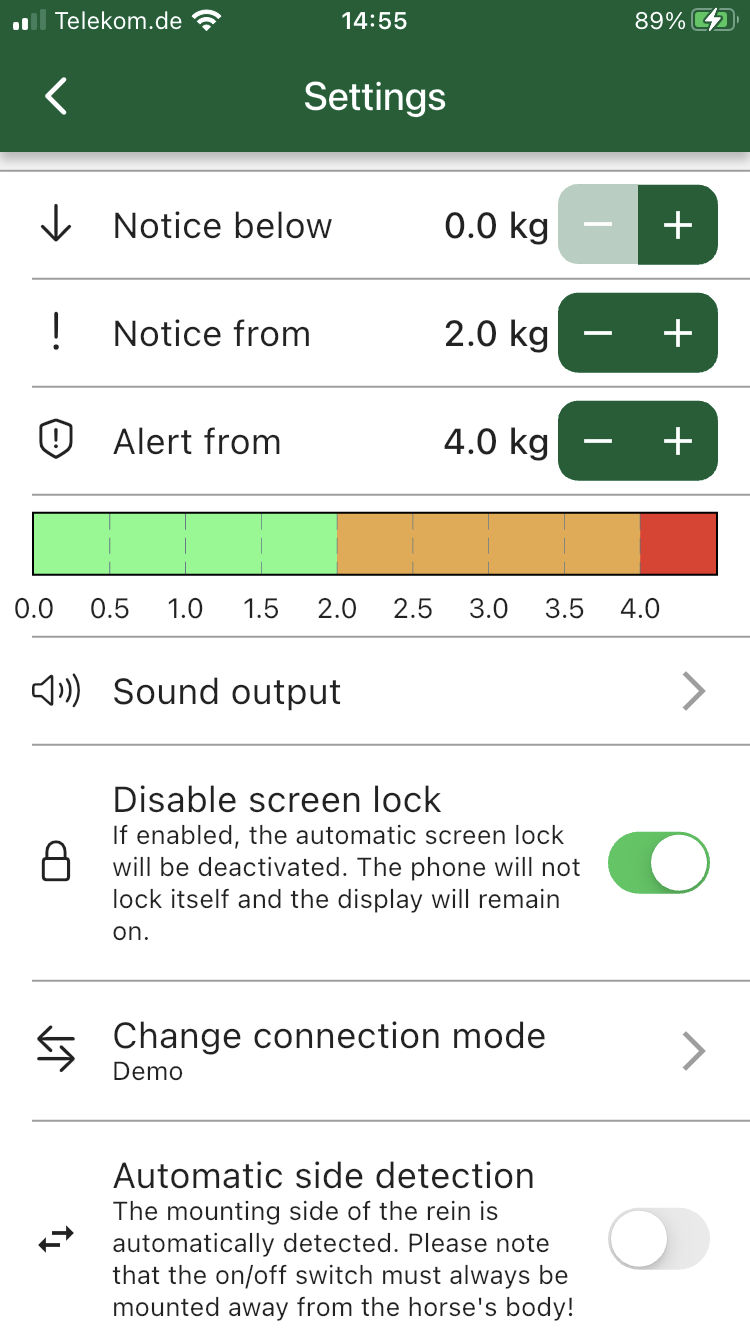
Define the upper and lower threshold for warnings (yellow), i.e. leaving the ideal voltage range, as well as the upper limit for reaching a critical level (alarm)
Switch the sound output on or off or change the mode, i.e. switch between sound or voice output
Activate the disable screen lock, which prevents your phone screen from switching off so that the app remains displayed
Change the connection mode from sensor to gateway or vice versa. This option is only available with the TensionCARE® Premium version
Activate or deactivate automatic side detection. As the name suggests, the sensor can automatically recognise the mounting side. Remember to mount the sensor correctly, i.e. with the charging pin/power button away from the horse to select the correct side.
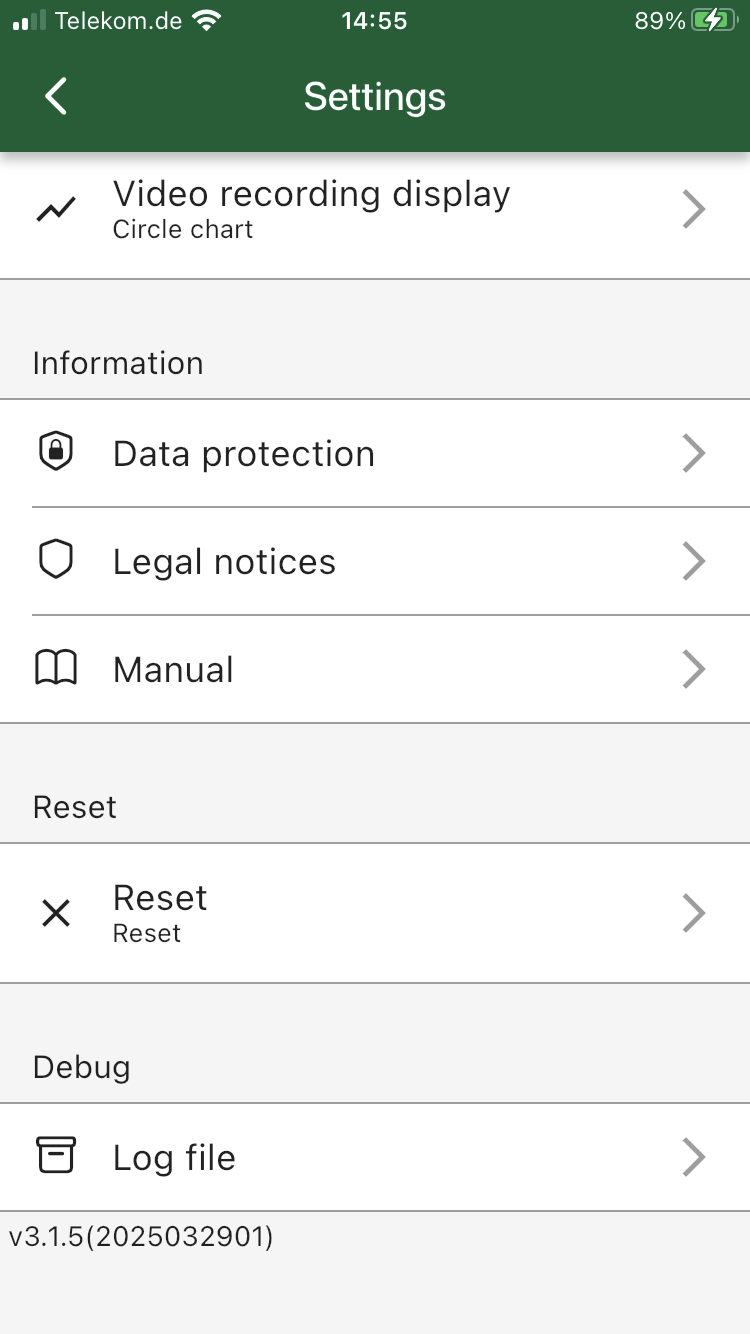
Select the force display on a video record by tapping on video recording display. You can choose between a line or a circle chart.
When you tap the Reset button, you will be asked to confirm if you want to reset everything, including settings, connections and pairings
Finally, you can access the logs by clicking the Log file button at the bottom. If you are experiencing technical issues, we recommend contacting our support team and sending the log file for a more detailed investigation and efficient solution search.
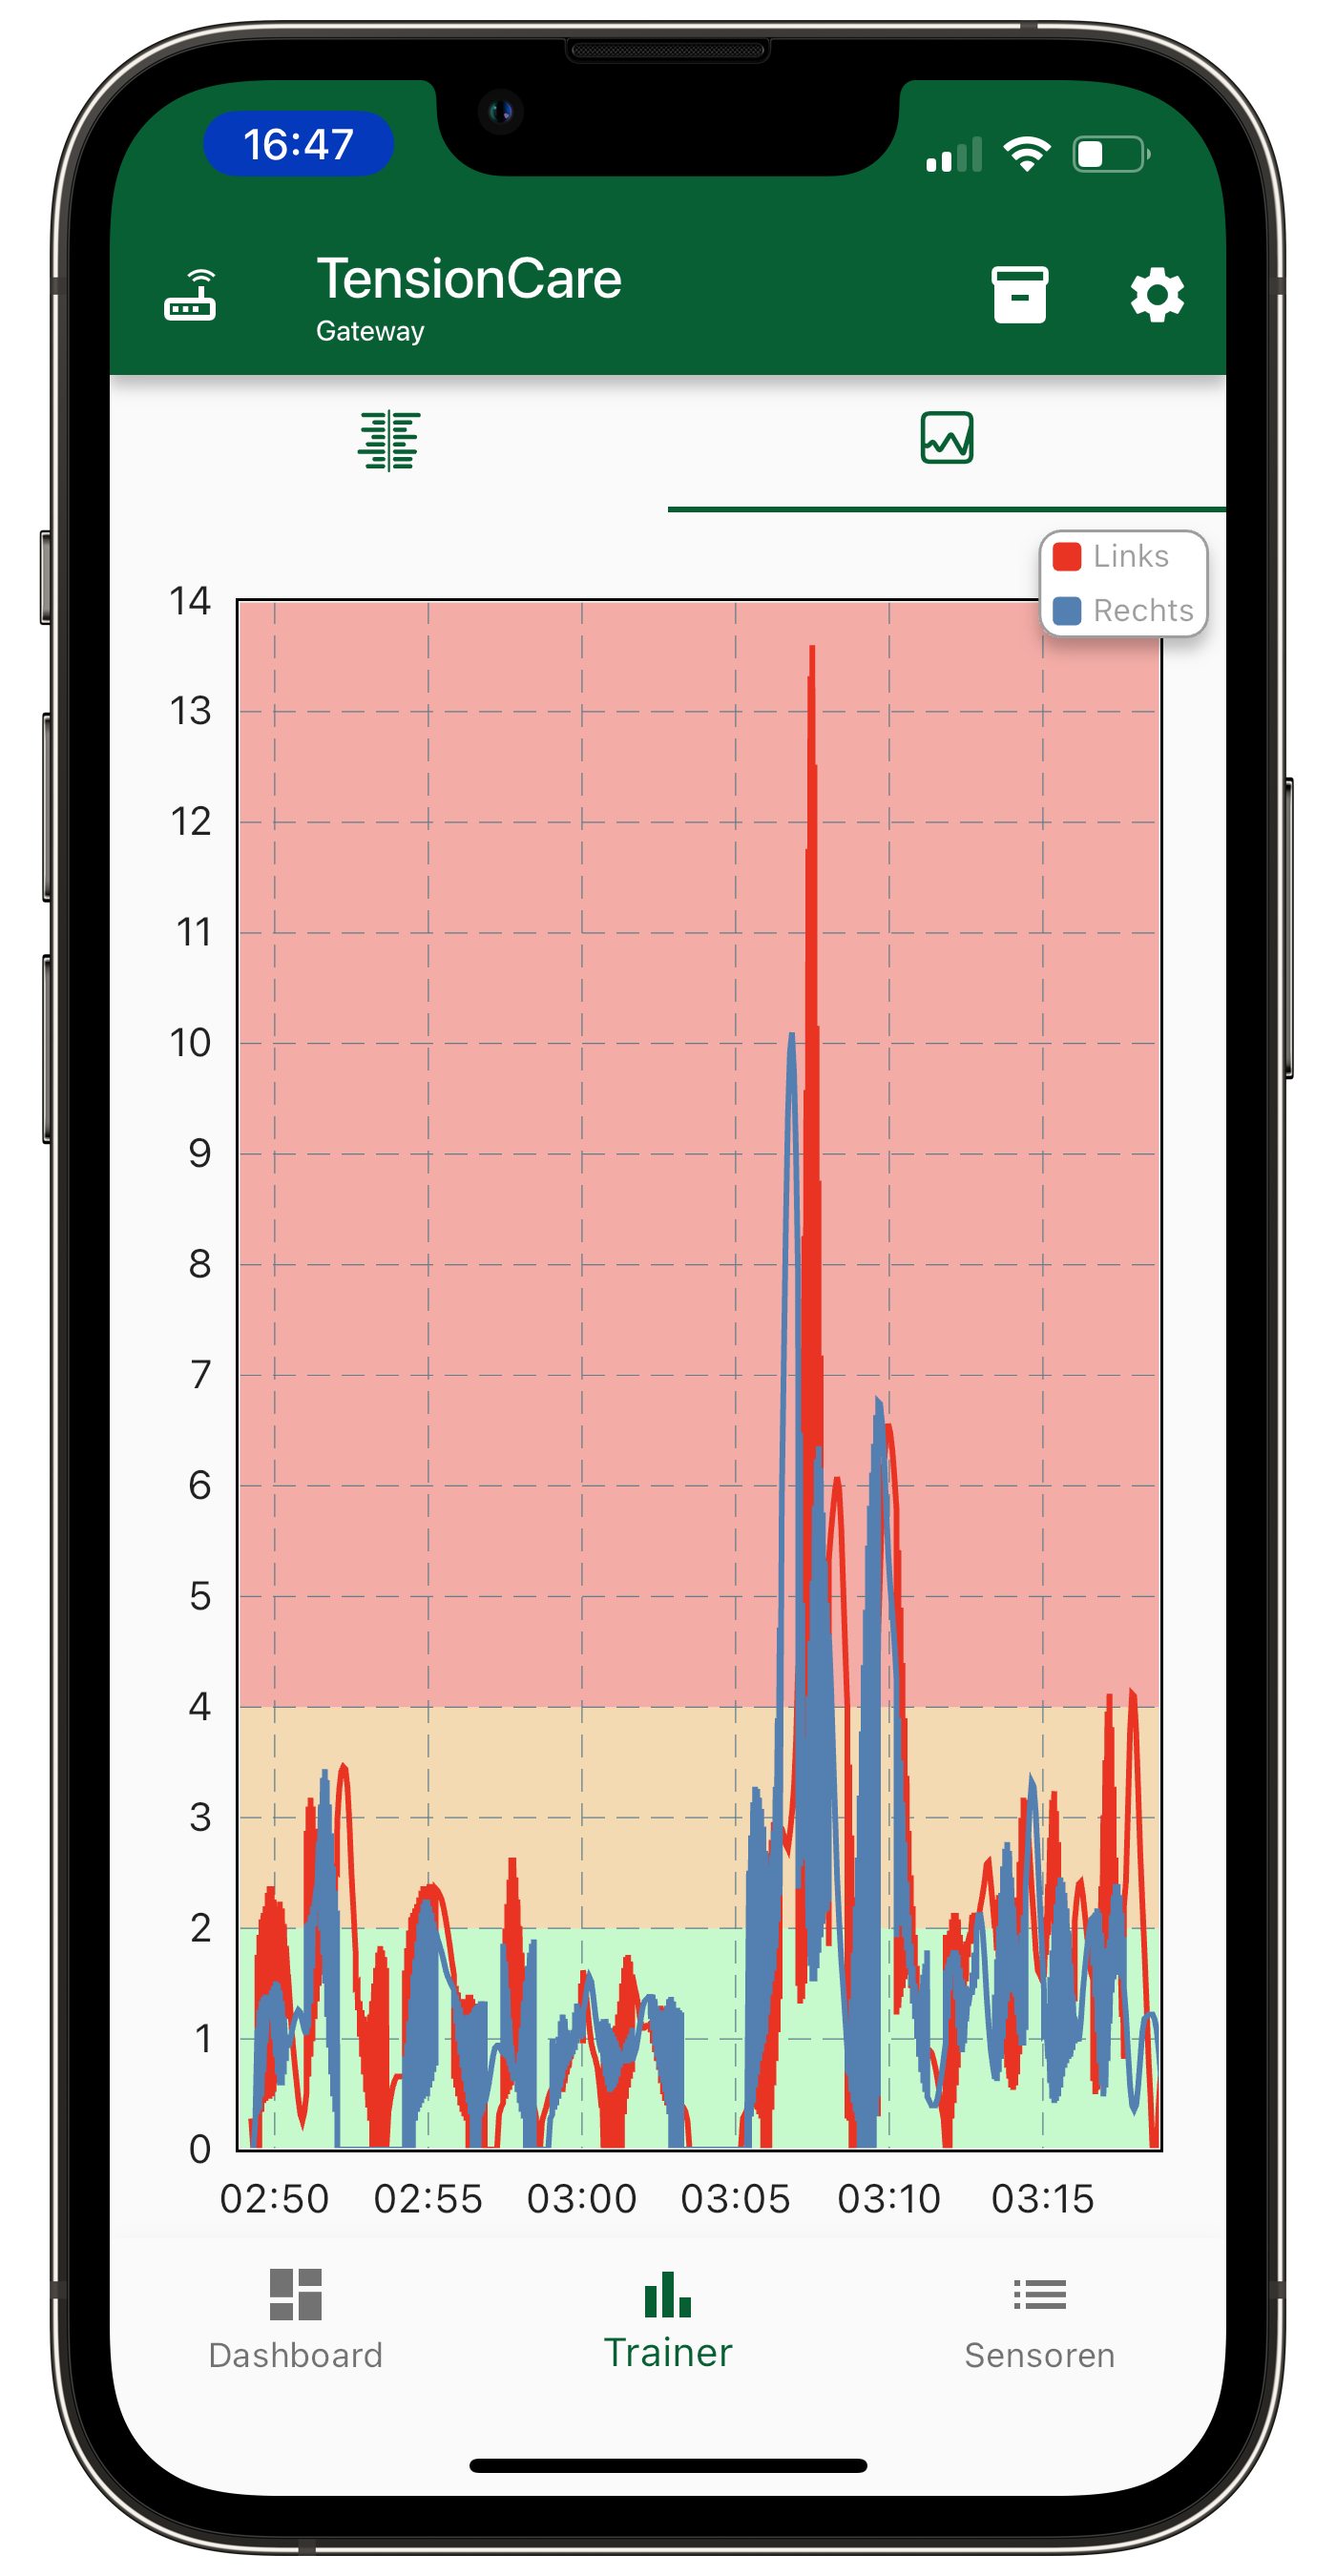
Trainer
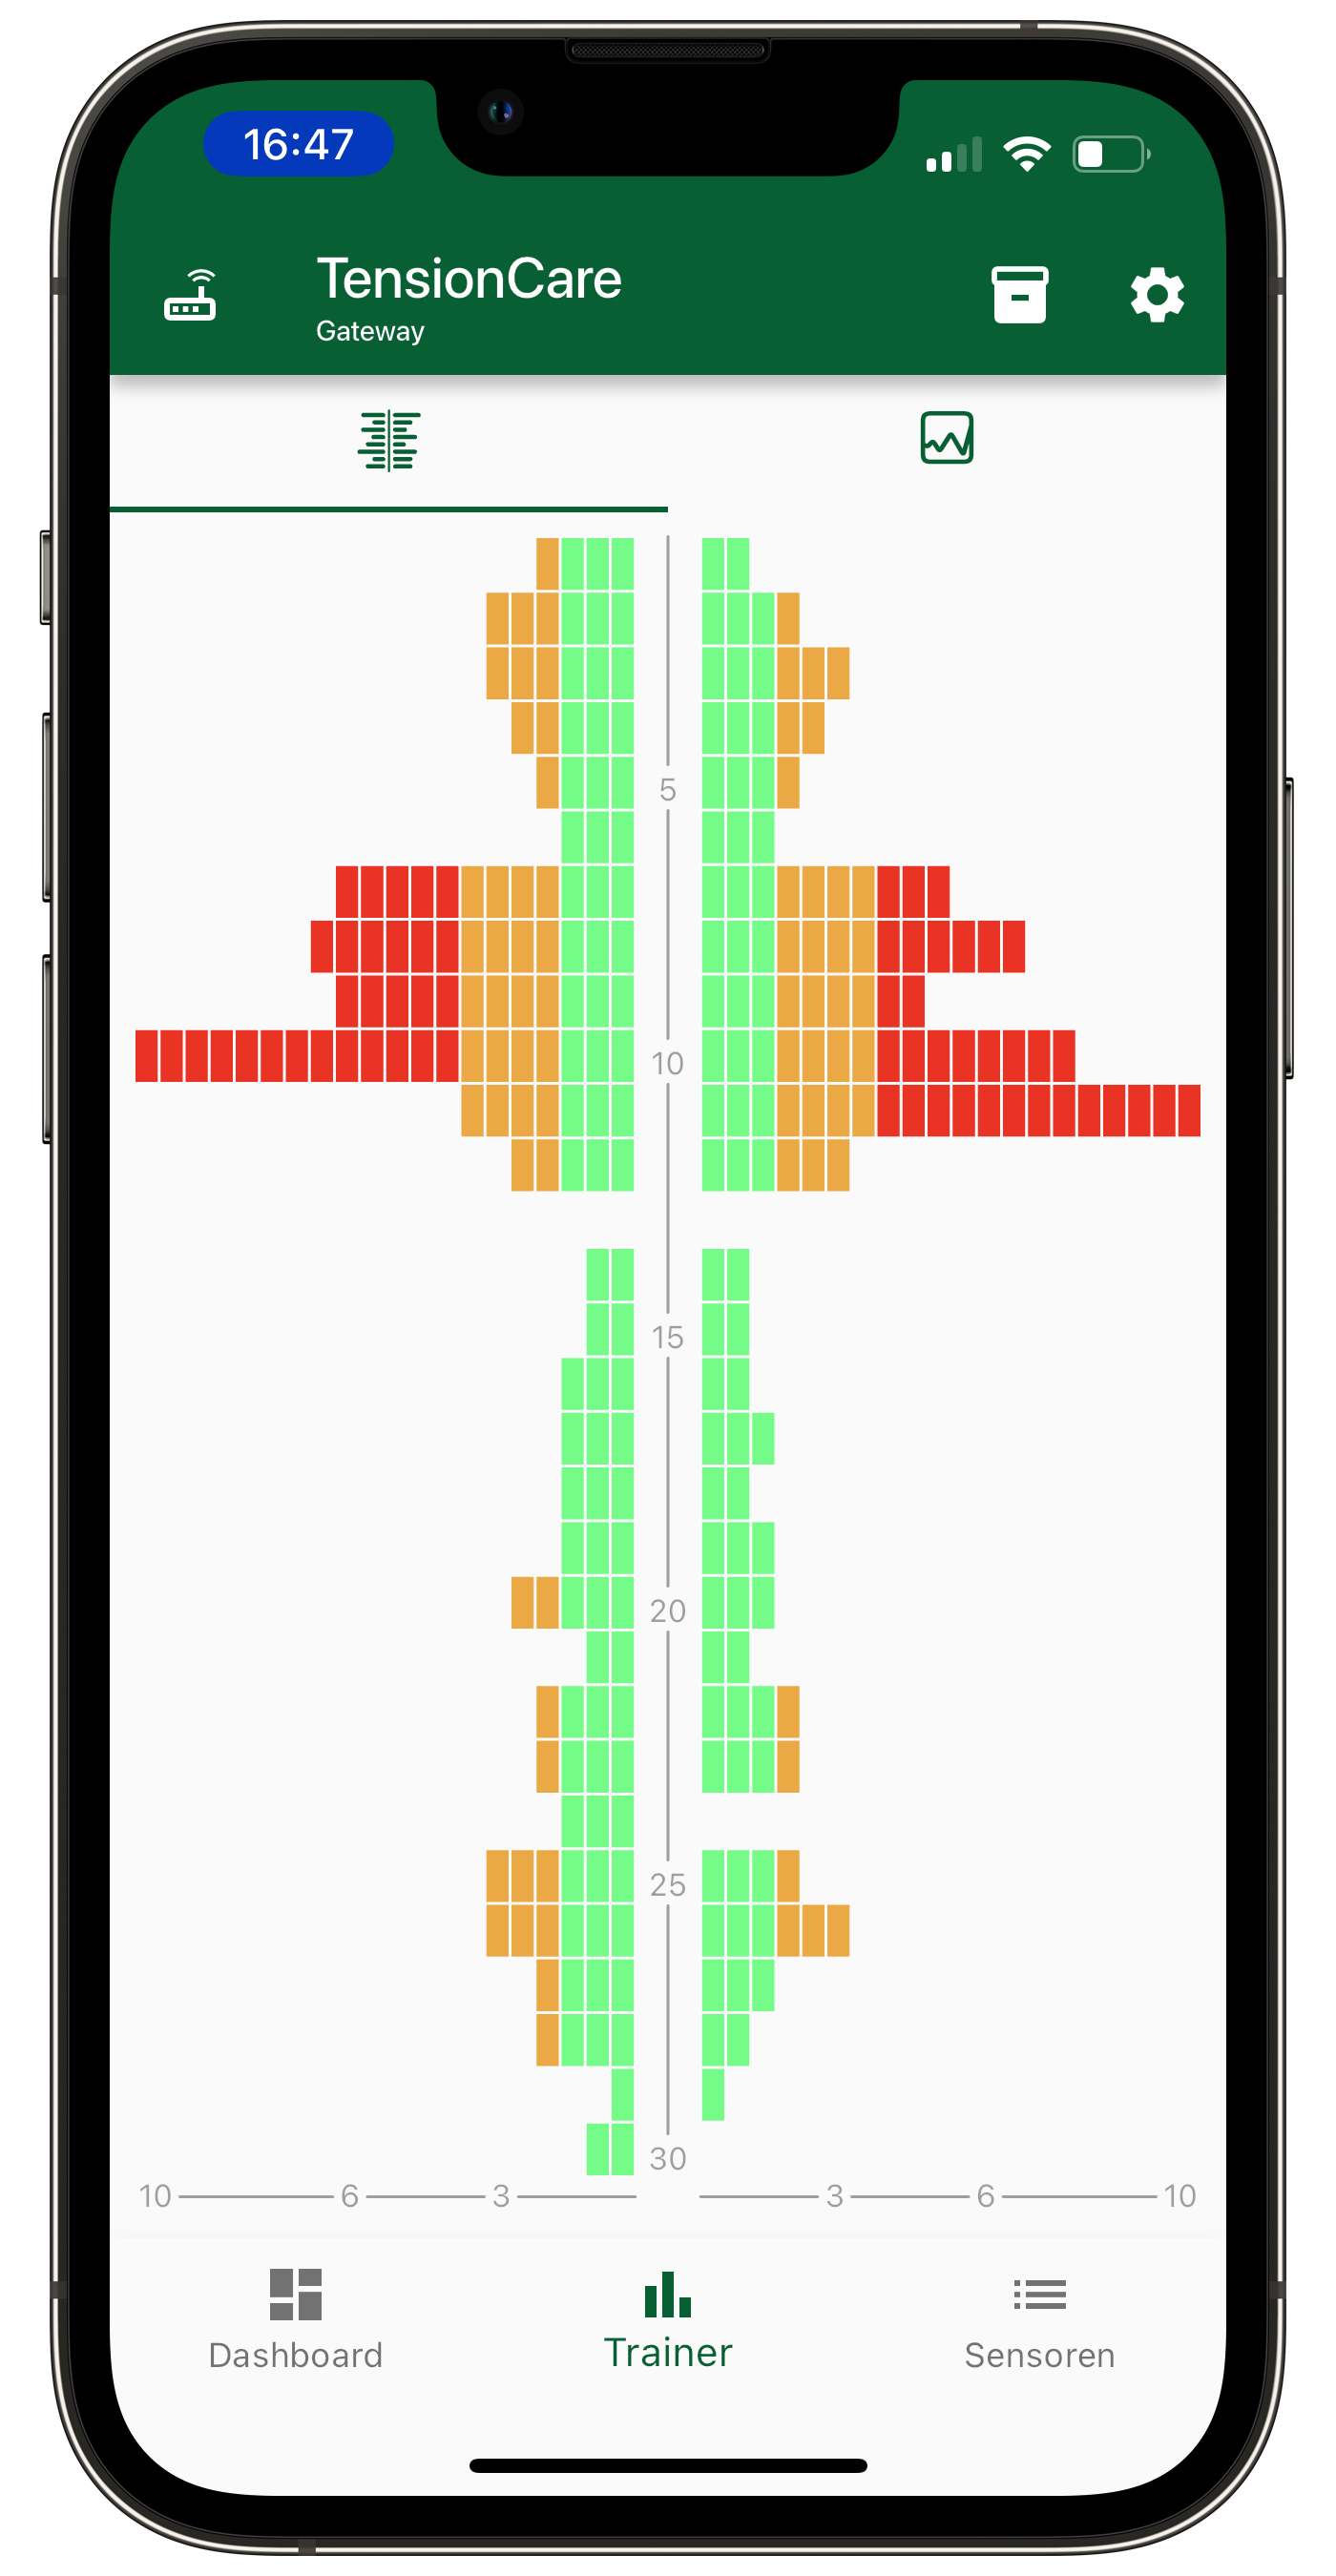
Tap on Trainer in the main menu of the app to open the trainer data. The dashboard shows you the measured values of the rein force sensors in real time. Sometimes it is advantageous to display the measured values over a certain time horizon. You can find a historical display of the measured values under the Trainer view menu item in the main menu. The measured values are currently displayed there on a second-by-second basis over a period of 30 seconds. Depending on your set threshold values, a corresponding colour display with the alarm limits from green to yellow, from yellow to red and vice versa is displayed.
The ‘Start recording’ functions are also available in this view.
Tap on >Trainer<
Here you can switch between two types of data visualisation by tapping on the corresponding symbol:
Sensors
Click on Sensors on the main screen of the app to access both sensors.
Click on one of the sensors to display the rein tension data and a range of options:
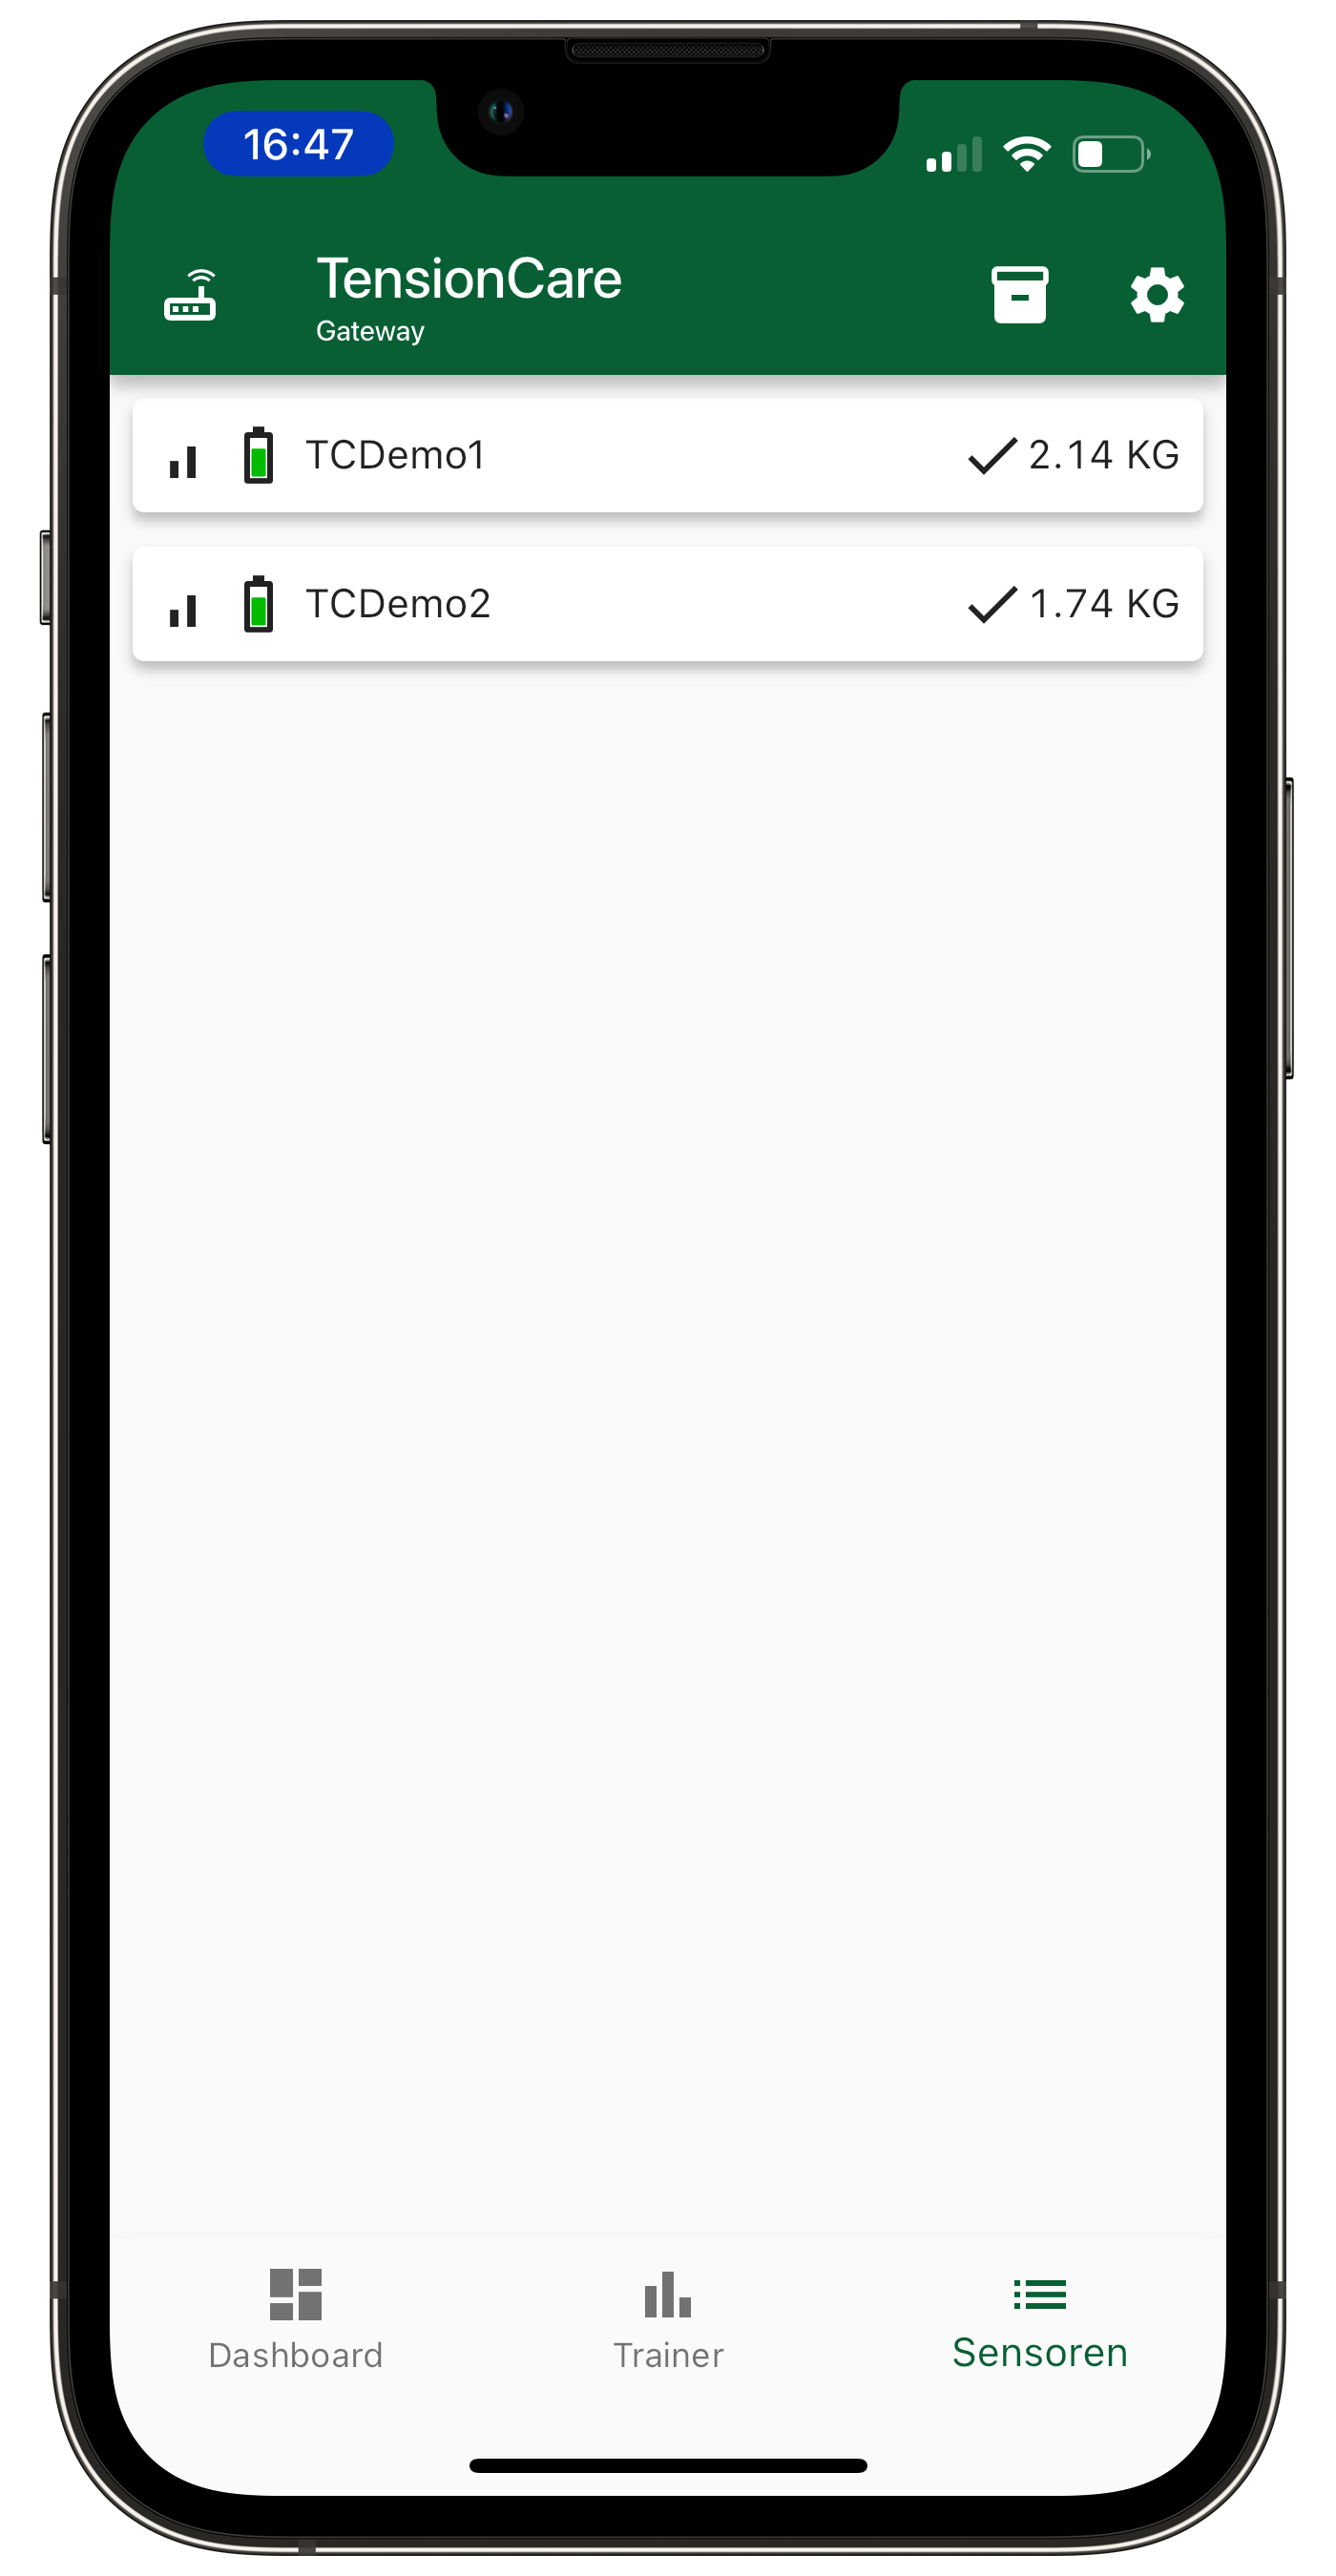
Tap on >Sensors<
Press the symbol to display the serial number
Rename the sensor by clicking on the pencil symbol
You can recognise the active connection mode (BLE or gateway) in the green field at the top left
Data recording
With TensionCARE® Premium you can also record the rein forces applied when riding and share them with other people. A comparison between riders helps to understand animal-friendly behaviour in sport and to find the most sensitive use of force for communication with the horse.
To start recording, simply click on the Start recording button
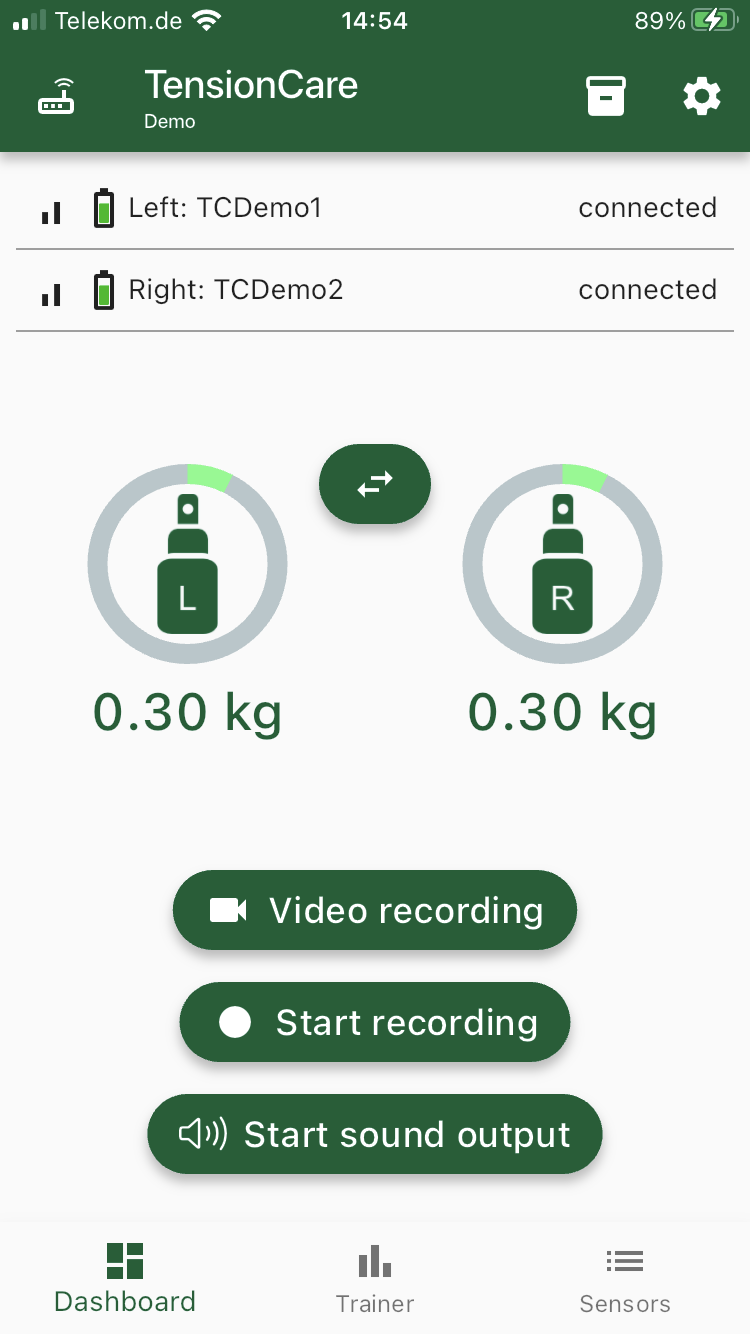
As soon as you tap this button, the app starts recording data and the button is highlighted in red. This is an indicator that the recording is running. When you are finished, go back to the dashboard and tap the Save recording button.
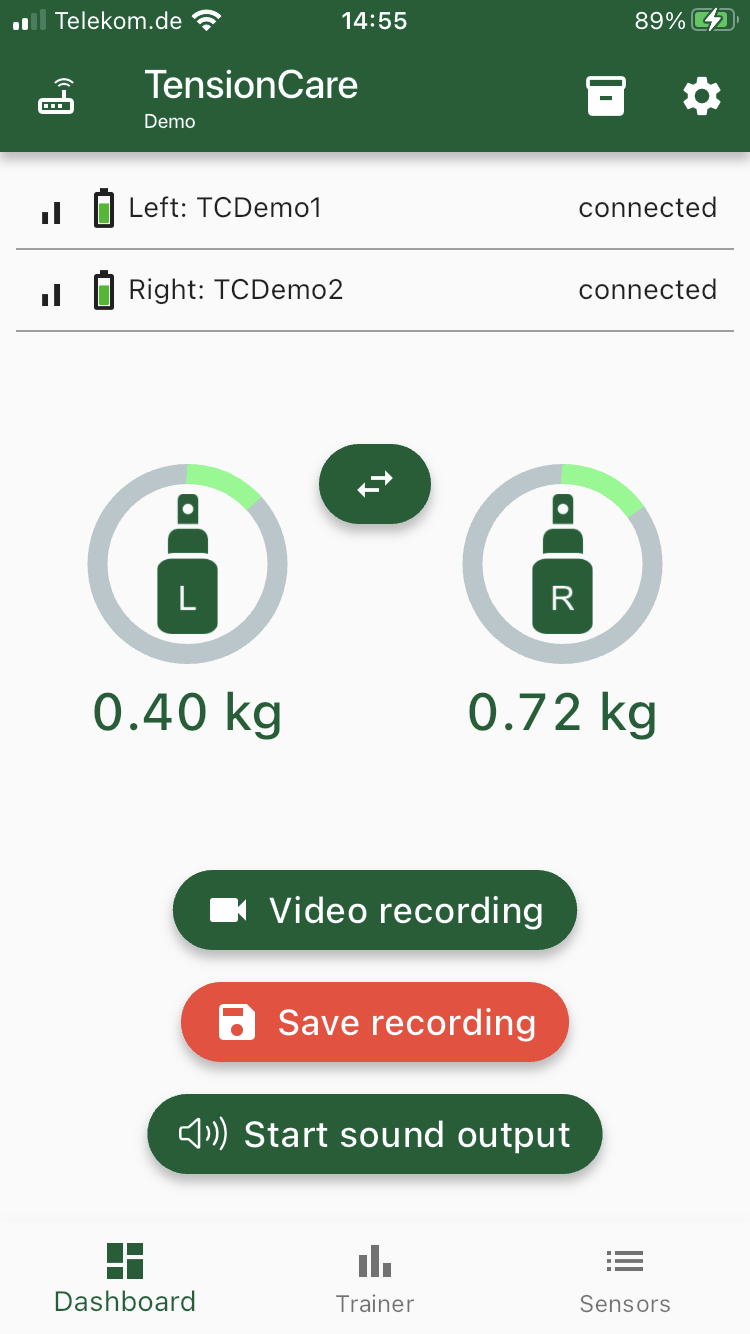
The app prompts you to enter a note for the recording that you want to save.
Enter a name or a note and tap Save to save the recording.
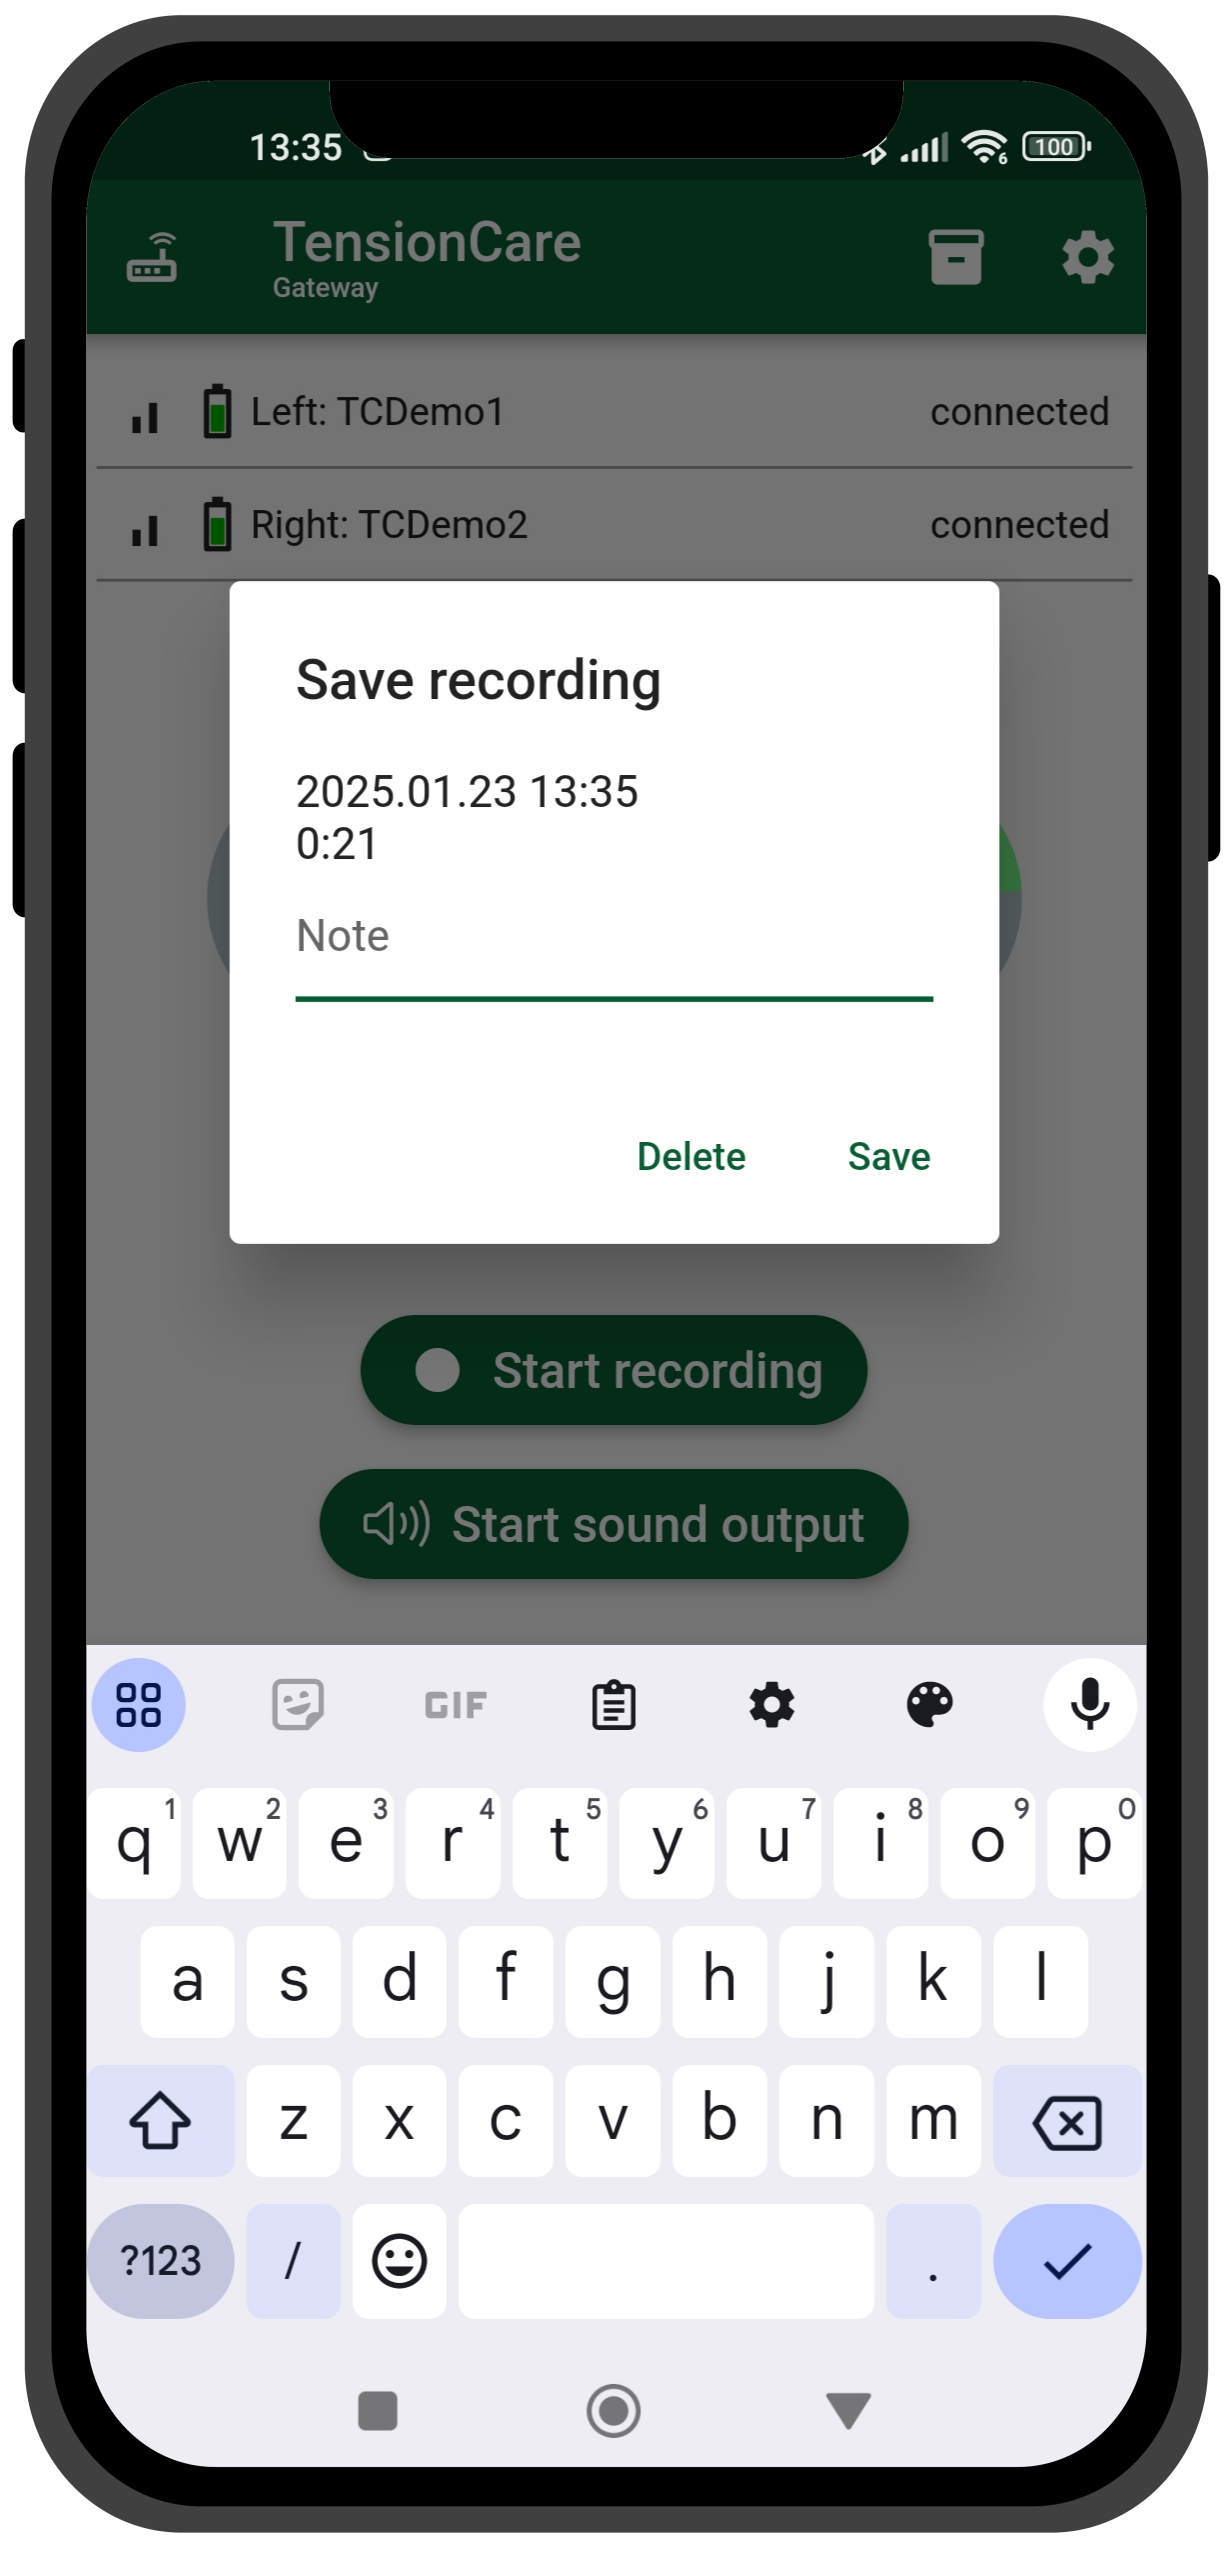
Enter a name and then tap on >Save<
To access the saved recordings, simply press the icon in the top right-hand corner.
The app displays a list of all saved recordings.
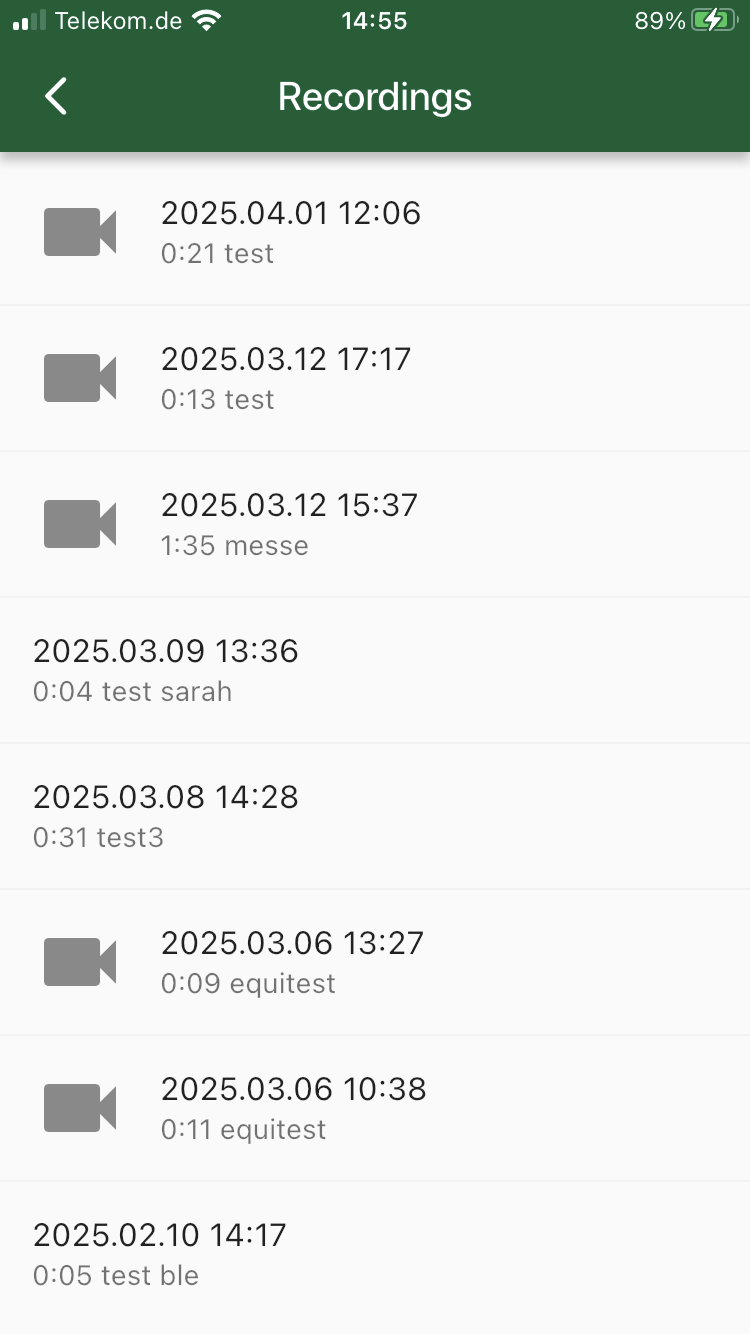
Tap on a recording to either delete it or share it directly from the app. The data is stored in csv format to allow further processing in as many different ways as possible. The CSV data can be further analysed in Excel, Numbers or SPSS, for example.
Video recording
With TensionCARE® Premium you can also record the rein forces applied during riding and combine this with a video. When analyzing the processes later, you can watch the video and see the rein forces applied at the same time.
To start the video recording, simply click on the Video recording button. The camera is activated and video recording starts immediately. Now point the camera at the rider & horse during the exercise, the rein forces will be displayed in the lower area. The rest of the process is identical to data recording.
When viewing the archive, video recordings are listed with a camera symbol.
Using videos
You can also share recorded videos with others. To do this, select the video by tapping on it.
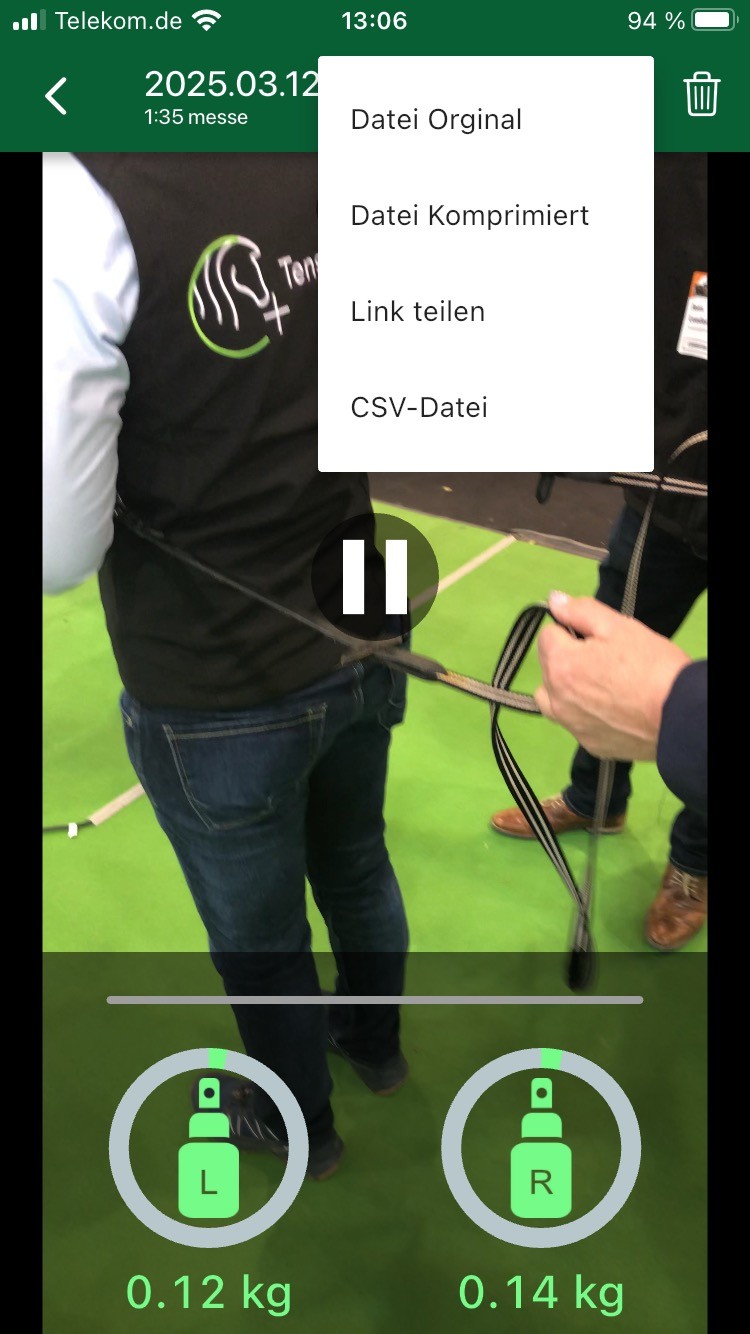
You have several options for sharing:
Tap on Original file if you want to send your video directly to another mobile device via AirDrop, WhatsApp, or similar. The recipient can view the file in the TensionCARE® app. The original size does not change the quality of the video, but the file can be very large depending on its length. In the app, you can choose to view the forces as lines or circles.
Select Compressed file if you want to reduce the size of the file for sending. The resolution of the video will then be 720p.
You can also select Share link to upload the video to the TensionCARE® cloud and send only the link. By clicking on the link, a third party can either view the video directly (variable force display as a line or circle) or download it as an MPEG (line graph only), so that it can be viewed without the app. Depending on the video size, it may take a while for the uploaded video to be available for download. Each video is stored in the cloud for a maximum of 30 days and is then automatically deleted.
If you only want to forward the data without the video, e.g. to save it as a log, click on CSV file. The recipient will then receive the data as a corresponding file, which can then be edited in Excel.
Before forwarding videos, please check whether data protection issues are involved.
Application recommendations
The following information has proven to be useful for optimum operation:
The connection of the sensors via Bluetooth (TensionCARE® Basic or selected in Premium) offers a limited data transmission range (max. 10m). The stability of data transmission can also vary greatly depending on the mobile device and firmware and is also dependent on environmental parameters
The gateway offers significantly greater data transmission stability and range. For an optimal user experience, it is necessary to have the gateway close to the mobile device. For this purpose, a holster is included in the scope of delivery, with which the gateway can be carried safely while riding
If you have purchased the TensionCARE® Premium version, you can change the mode at any time by pressing the settings icon in the upper right corner and selecting the preferred method. Please note that when using Bluetooth mode, only one user can use this mode at a time. Other observers in the current riding session will not be able to find the sensors outside of gateway mode
Trainer view
I
You can find out more about these two functions in the ‘Dashboard’ section.
Note: The app functions shown may vary depending on the software version.